A new Valentine’s Day spam email has been detected by Websense as containing a Waledac variant. Websense Security Labs has reported to have seen several fake Valentine’s Day sites serving up malware recently, with an increase in adult dating and ‘healthcare’ related email spam released to mark the occasion. Carl Leonard, Websense threat research manager, claimed that it works by the user opening the URL in the spammed message and being redirected to a site with two puppies and a love heart to give a Valentine’s theme. The user is then enticed to download a Valentine’s kit to prepare a present for a loved one, which is a new Waledac variant.
Leonard said: “The usual suspects have emerged as expected, with Valentine spam emails and Trojans. The public are becoming more aware of these and it is getting harder to trick people this way. Cybercriminals are also taking their efforts to social networks, given its rising popularity and potential to manipulate the user through ‘friend’ messages.
“Organised criminal units have a long history of timing their attacks to coincide with popular occasions in order to achieve maximum success. Valentine’s Day 2009 is a day that is similarly marked on the criminals’ calendar for targeted attacks.â€
Websense has warned of three key signs of fake sites: ‘Broken Hearts’ sites show colourful images such as puppy dogs or a picture of 12 pretty hearts and ask ‘Guess, which one is for you?’. The web page however is one big image and a single click from a tricked user commences the download of Trojans named “onlyyou.exe†or “youandme.exeâ€, which can connect to remote websites to receive commands and send information about the compromised system.
‘I am your friend’ uses social networking tricks to get users to visit fake sites, with Websense claiming that a popular technique at the moment is spam email pretending to originate from social networking sites – complete with love hearts and cartoon characters. Clicking through to the link would download a Trojan designed to steal log in credentials for banking sites.
Seventy per cent of the top 100 most popular websites either hosted malicious content or contained a masked redirect to lure unsuspecting victims from legitimate sites to malicious sites. Specially created malicious sites are in decline as cybercriminals switch to compromising ‘trusted’ websites. Websense claimed that as there is increased confidence in shopping and researching online - a lot of which happens whilst in the office – people are turning to the internet to order flowers, chocolates and other gifts and cybercriminals are compromising these sites and stealing data.
Leonard said: “The underground economy is positively flourishing as companies fail to keep up with security technology. Criminals are taking advantage of the growing number of Web 2.0 properties, which allows user generated content. More than ever we’re seeing websites injected with links to direct users to malicious and compromised sites.
“Since many email security systems lack web intelligence, spammers have also stepped up email campaigns which contain links to malicious web pages. It’s clear that businesses need security with real-time protection, but until this becomes the norm – cybercriminals will continue stealing data and breaking hearts.â€
source : http://www.hacking-news.com/
Showing posts with label services. Show all posts
Showing posts with label services. Show all posts
Sunday, February 7, 2010
Wednesday, December 16, 2009
Using RADIUS to Authenticate Logins
In this post i'll detail how to set up a Windows IAS RADIUS server to authenticate user login on a router.
Windows IAS Server Setup
- Create a Windows Security group with the users you want to allow access to the routers
- Enable the user accounts to have Dial-in Access.
- Install IAS on the server (from Add Remove programs).
- Create a new cisco RADIUS Client, point it to the Router and supply a shared key. Set the Grant Remote Access.

5. Create a new Remote Access Policy with the following settings:
- Windows Group (point this to the group you created)
- Edit the profile and set the autentication to PAP
- Under the advanced tab set the service type value to login & remove Framed-Protocol.

Thats really it. A detailed tutorial on setting up your IAS server can be found here.
Router Setup
Here I am going to configure my router to use AAA Authorization to authorise access by looking at the user credentials in Active Directory (AD). Remember, only AD users in the group I created above will be able to login with their windows credentials.
First I'll talk you through what I'm doing in the following commands.
I'm creating a local user on the router called syn. This is so I can still get into the router if my RADIUS server fails.
I enable AAA and I create a new entry in AAA to point to my RADIUS server (using the default ports) and give it a the key "cisco" to match what we set up on the RADIUS server.
I then enable my ethernet interface on the same LAN as the RADIUS server as the RADIUS source interface and create a AAA authentication login method list called AuthList. This rule will first look to authenticate by RADIUS and then locally if the RADIUS server fails. I then apply the method list to my VTY (Telnet/SSH) ports.
R1>en
Password:
R1#
R1#conf t
Enter configuration commands, one per line. End with CNTL/Z.
R1(config)#user syn password cisco
R1(config)#aaa new-model
R1(config)#radius-server host 10.0.1.230 auth-port 1645 acct-port 1646 key cisco
R1(config)#ip radius source-interface ethernet 1
R1(config)#aaa authentication login AuthList group radius local
R1(config)#line vty 0 4
R1(config-line)#login authentication AuthList
R1(config-line)#exit
R1(config)#exit
R1#
A detailed tutorial can be found here. Just remember to enable the user account for Dial-in access in the AD account properties.
After setting this up I also needed to configure RADIUS authentication on my Console port and Aux port using the following for each port:
R1(config)#line console 0
R1(config-line)#login authentication AuthList
R1(config-line)#exit
R1(config)#line aux 0
R1(config-line)#login authentication AuthList
R1(config-line)#exit
R1(config)#exit
R1#
Troubleshooting
Debugging on the router can be achieved with the following commands:
R1# terminal monitor
R1# debug aaa authentication
The command below will test a login from the router. You should be able to check your event logs and IAS logs on the RADIUS server to see this account authenticate.
R1# test aaa group radius syn SuperStrongPassword port 1645 new-code
Configuring Router Interfaces
In this post I'll cover the configuration of an ethernet interface on the router, and I'll demonstrate commands to interrogate and help troubleshoot the interfaces.
Lab Setup
In this lab I'll have two router and I'll configure them to talk to each other
To start with you might want to clarify exactly which interfaces your router might have. This can be done visually (by looking at the device) or by using some of the excellent show commands.
The show version command will print to the screen exactly which interfaces are installed.
R0>en
Ro#show version
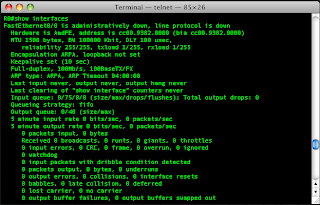
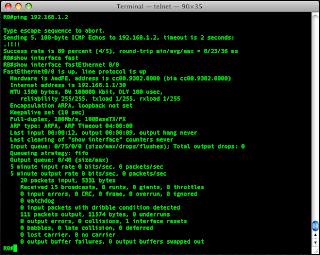
The show interfaces command gives details on the configuration of the interface, setting such as duplex and speed, and it will also show traffic statistics.
R0#show interfaces
If you have many interfaces in your router you can just focus on a single interface using the interface number (remember, slot/port):
R0#show interfaces fastethernet 0/0
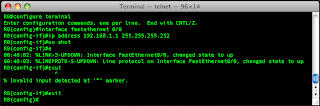
From the output I can see that the interface isn't configured. I'll configure that port and then take another look. I'll go into configuration mode select the interface, give it an IP address and subnet mask then tell it not to be in the shutdown state. Remember, by default all ports are in a shutdown state. Another import thing to remember is if you restore your config from a backup the ports will need to be taken out of the shutdown state manually.
R0>enable
R0#configure terminal
R0(config)#interface fastethernet 0/0
R0(config-if)#ip address 192.168.1.1 255.255.255.252
R0(config-if)#no shut
R0(config-if)#exit
I saw the line come up when I was setting the port up, so now i'll ping my other router.
Wel the ping came back fine and after another look at the interface I can see it has the right IP address and the counters are updating nicely.
Another great command for looking at the interface is:
R0#show ip interface fastethernet 0/0
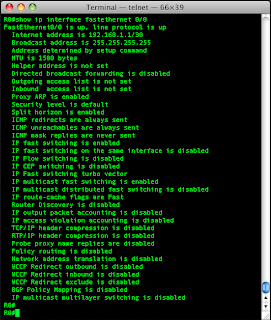
This shows me absolutely everything that is set or can be set on the interface.
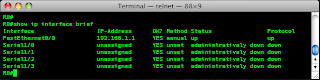
And finally one last command for looking at the interface status in a nice condensed format is:
R0#show ip interface brief
Here I see all interfaces, what there IP addresses are and whether they are up or not.
So this has been a quick post on setting up an interface with an IP address and using some handy show commands to check the interface.
Lab Setup
In this lab I'll have two router and I'll configure them to talk to each other

To start with you might want to clarify exactly which interfaces your router might have. This can be done visually (by looking at the device) or by using some of the excellent show commands.
The show version command will print to the screen exactly which interfaces are installed.
R0>en
Ro#show version

The show interfaces command gives details on the configuration of the interface, setting such as duplex and speed, and it will also show traffic statistics.
R0#show interfaces

If you have many interfaces in your router you can just focus on a single interface using the interface number (remember, slot/port):
R0#show interfaces fastethernet 0/0
From the output I can see that the interface isn't configured. I'll configure that port and then take another look. I'll go into configuration mode select the interface, give it an IP address and subnet mask then tell it not to be in the shutdown state. Remember, by default all ports are in a shutdown state. Another import thing to remember is if you restore your config from a backup the ports will need to be taken out of the shutdown state manually.
R0>enable
R0#configure terminal
R0(config)#interface fastethernet 0/0
R0(config-if)#ip address 192.168.1.1 255.255.255.252
R0(config-if)#no shut
R0(config-if)#exit

I saw the line come up when I was setting the port up, so now i'll ping my other router.

Wel the ping came back fine and after another look at the interface I can see it has the right IP address and the counters are updating nicely.
Another great command for looking at the interface is:
R0#show ip interface fastethernet 0/0

This shows me absolutely everything that is set or can be set on the interface.
And finally one last command for looking at the interface status in a nice condensed format is:
R0#show ip interface brief
Here I see all interfaces, what there IP addresses are and whether they are up or not.

So this has been a quick post on setting up an interface with an IP address and using some handy show commands to check the interface.
Securing Your Router
In this post i'll cover the following:
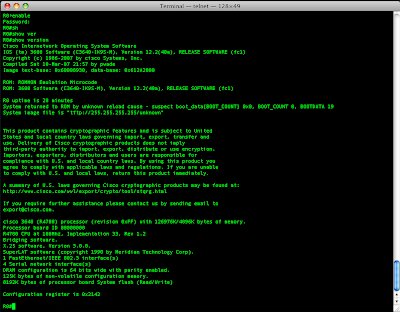
Right. So I've got my test lab set up. To start with i'll just have one router called R0. I'll demonstrate how to configure the router and secure it. I bring up the console after starting R0 and Terminal (on the Mac by the way) acts as if I was physically connected to the console port on the router itself. After the IOS decompresses and is loaded into RAM I'm prompted to enter the initial configuration setup. I say no to this as I will be manually configuring the router.The first thing I want to do is give my router an Enable password. The reason for doing so is after I give the interface an IP address there is a window of opportunity for someone to look at the configuration and glean some information that I might not necessarily want them to see.I enter the Enable mode by typing:Router>enableThis will change the prompt from a > symbol to a hash #. Before you enter into the Enable mode there are only limited commands available, these can be viewed by typing ? at the prompt as shown in the previous post.Remember, the hash symbol will be present whenever I am in the Enable mode, and it's from here that I can perform configuration and diagnostic tasks.Router#configure terminalTo configure an enable password as "letmein" I type:Router(config)#enable secret letmeinThis will create a password for the Enable mode and within the configuration it will be encrypted. The password is encrypted with Type 5 encryption (I'll come back to this in a bit).After this I'll give my router a name and a DNS domain name, set the clock and tell it what DNS Servers to use:Router(config)#hostname R0R0(config)#ip domain name home.localR0(config)#ip name-server 10.0.1.1R0(config)#exitR0#clock set 22:00:00 16 aug 2009Notice that my prompt changed to reflect my new name.
 Okay, right now I have a Console port and an Auxilary port I want to configure.To start with I'll secure the Console port. From the Enable mode I want to enter into Configuration mode and then into console port configuration mode. To do this i use the following commands:R0(config)#line con 0R0(config-line)#logging synchronousR0(config-line)#exec-timeout 10 0R0(config-line)#password flipperR0(config-line)#loginR0(config-line)#exitR0(config)#What I have done here is selected to configure line con 0 which is the console port. The prompt changed to indicate which configuration mode I am in. I told it to set logging to synchronous, which means when the informational messages or debugging messages hit the screen it wont screw with my command. I have then set the exec-timeout to 30 minutes and 0 seconds which means my console session will be disconnected after 30 minutes of inactivity. I could have set this to not time out by using 0 minutes and 0 seconds. I have then set my console password to flipper and told it to prompt me to log in by issuing the login command. After entering those I used the exit command to come out of the line con 0 configuration and get back to the configuration mode.I'll do the same for the Aux port as this can be used to access the router as well.R0(config)#line aux 0R0(config-line)#logging synchronousR0(config-line)#exec-timeout 30 0R0(config-line)#password flipperR0(config-line)#loginR0(config-line)#exitR0(config)#After securing the ports I want to set up a banner on my router to warn any unauthorised people that they should not be accessing the router. I do this with the following:R0(config)#banner motd % No unauthorised access %R0(config)#exit
 Different banners can be created for events such as prompt timeout, login, exec or for SLIP/PPP. They can also be real fancy and have ASCII art if you so wish.After all this configuration I look at the running config to check all is as it should be.R0#show running-config
 Here I am able to see all the commands I have entered. Now it's important to remember that the commands take effect as soon as they are typed (and you have pressed enter of course!).One thing that bothers me about the running config as shown in the screenshot is my console passwords and aux port passwords are in clear text. Anyone looking over my shoulder (the wife or dog) could see these and they would be well on there way to owning my router. I can fix this by turning on the password encryption service, showing the config again and then turning it off. But remember, when we configure the VTY (Telnet) ports in a later post I need to do this again otherwise the new VTY ports passwords will be clear text.R0#configure terminalR0(config)#service password-encryptionR0(config)#exitR0#show running-configR0(config)#no service password-encryptionR0(config)#endSo I have entered configuration mode, turned on the password encryption service, looked at the config, then I turned the service off.Now looking at the config I see that the passwords are encrypted with Type 7 encryption. Now one thing about Type 7 encryption, its a piece of piss to crack, Cape in will do it as will many websites. All that Type 7 will do is stop the casual observer from seeing an easily remembered password (if thats what you use). Obviously its goes without saying that your Enable password should be different from the port passwords you set.
 One last thing I noticed is the IP http server is enabled by default.
  As I dont plan to use this I disable it using the "no" commandR0(config)#no ip http serverI check this has worked with another show running-configR0#show running-config
 After finally setting up my router so it is secure i save the settings from running-config to startup-config.R0#copy running-config startup-configR0#show startup-configWhat I have done here is copied the running-config in RAM to the startup-config in NVRAM. The router will prompt me to give the configuration a name but I just press enter to select the default option that is shown in square brackets. After that completed I checked the startup-config.
 In my next post I'll be looking at getting telnet and SSH set up.
Securing Your Router
In this post i'll cover the following:
Right. So I've got my test lab set up. To start with i'll just have one router called R0. I'll demonstrate how to configure the router and secure it.I bring up the console after starting R0 and Terminal (on the Mac by the way) acts as if I was physically connected to the console port on the router itself. After the IOS decompresses and is loaded into RAM I'm prompted to enter the initial configuration setup. I say no to this as I will be manually configuring the router.The first thing I want to do is give my router an Enable password. The reason for doing so is after I give the interface an IP address there is a window of opportunity for someone to look at the configuration and glean some information that I might not necessarily want them to see.I enter the Enable mode by typing:Router>enableThis will change the prompt from a > symbol to a hash #. Before you enter into the Enable mode there are only limited commands available, these can be viewed by typing ? at the prompt as shown in the previous post.Remember, the hash symbol will be present whenever I am in the Enable mode, and it's from here that I can perform configuration and diagnostic tasks.Router#configure terminalTo configure an enable password as "letmein" I type:Router(config)#enable secret letmeinThis will create a password for the Enable mode and within the configuration it will be encrypted. The password is encrypted with Type 5 encryption (I'll come back to this in a bit).After this I'll give my router a name and a DNS domain name, set the clock and tell it what DNS Servers to use:Router(config)#hostname R0R0(config)#ip domain name home.localR0(config)#ip name-server 10.0.1.1R0(config)#exitR0#clock set 22:00:00 16 aug 2009Notice that my prompt changed to reflect my new name.Okay, right now I have a Console port and an Auxilary port I want to configure.To start with I'll secure the Console port. From the Enable mode I want to enter into Configuration mode and then into console port configuration mode. To do this i use the following commands:R0(config)#line con 0R0(config-line)#logging synchronousR0(config-line)#exec-timeout 10 0R0(config-line)#password flipperR0(config-line)#loginR0(config-line)#exitR0(config)#What I have done here is selected to configure line con 0 which is the console port. The prompt changed to indicate which configuration mode I am in. I told it to set logging to synchronous, which means when the informational messages or debugging messages hit the screen it wont screw with my command. I have then set the exec-timeout to 30 minutes and 0 seconds which means my console session will be disconnected after 30 minutes of inactivity. I could have set this to not time out by using 0 minutes and 0 seconds. I have then set my console password to flipper and told it to prompt me to log in by issuing the login command. After entering those I used the exit command to come out of the line con 0 configuration and get back to the configuration mode.I'll do the same for the Aux port as this can be used to access the router as well.R0(config)#line aux 0R0(config-line)#logging synchronousR0(config-line)#exec-timeout 30 0R0(config-line)#password flipperR0(config-line)#loginR0(config-line)#exitR0(config)#After securing the ports I want to set up a banner on my router to warn any unauthorised people that they should not be accessing the router. I do this with the following:R0(config)#banner motd % No unauthorised access %R0(config)#exitDifferent banners can be created for events such as prompt timeout, login, exec or for SLIP/PPP. They can also be real fancy and have ASCII art if you so wish.After all this configuration I look at the running config to check all is as it should be.R0#show running-configHere I am able to see all the commands I have entered. Now it's important to remember that the commands take effect as soon as they are typed (and you have pressed enter of course!).One thing that bothers me about the running config as shown in the screenshot is my console passwords and aux port passwords are in clear text. Anyone looking over my shoulder (the wife or dog) could see these and they would be well on there way to owning my router. I can fix this by turning on the password encryption service, showing the config again and then turning it off. But remember, when we configure the VTY (Telnet) ports in a later post I need to do this again otherwise the new VTY ports passwords will be clear text.R0#configure terminalR0(config)#service password-encryptionR0(config)#exitR0#show running-configR0(config)#no service password-encryptionR0(config)#endSo I have entered configuration mode, turned on the password encryption service, looked at the config, then I turned the service off.Now looking at the config I see that the passwords are encrypted with Type 7 encryption. Now one thing about Type 7 encryption, its a piece of piss to crack, Cape in will do it as will many websites. All that Type 7 will do is stop the casual observer from seeing an easily remembered password (if thats what you use). Obviously its goes without saying that your Enable password should be different from the port passwords you set.One last thing I noticed is the IP http server is enabled by default. As I dont plan to use this I disable it using the "no" commandR0(config)#no ip http serverI check this has worked with another show running-configR0#show running-configAfter finally setting up my router so it is secure i save the settings from running-config to startup-config.R0#copy running-config startup-configR0#show startup-configWhat I have done here is copied the running-config in RAM to the startup-config in NVRAM. The router will prompt me to give the configuration a name but I just press enter to select the default option that is shown in square brackets. After that completed I checked the startup-config.In my next post I'll be looking at getting telnet and SSH set up.
A Bit Of A Change - Yet Another Update
In the immortal words of Peter Doherty "Promises promises, I know, you've heard them all before...."
For the foreseeable future, or at least until I have passed the CCNA and maybe the Security specialisation after that, I'm going to focus on Cisco related posts. Originally The aim of this blog was for me to spend time learning something and then blog about it which then hopefully might help anyone who stumbles across it. Blogging what I have been learning also helps me to remember stuff and an added bonus is my blog serves as an accessible reference for me to use when i need to refer back to something in the future.
Great, that out the way i'll just describe my setup and then i'll get down to some nitty gritty Cisco IOS fun.
The book I am using to study for the CCNA is CCNA - Cisco Certified Network Associate Study Guide by Todd Lammle. This book was recommended to me by a mate and I really couldn't recommend it enough. The book was worth every penny and his writing style makes a joy to read.
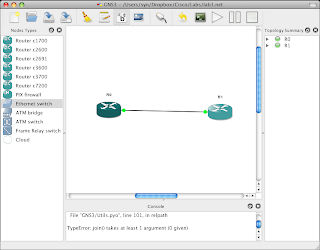
What I'm using for my lab is a Cisco 2950 switch (that I got out of a bin!) and the GNS3 software. GNS3 is a program (windows, linux and Mac) that allows you to take a IOS image from a router or pix firewall and sort of run it in an emulator so you can access it and configure it just like the real device. Within the software you can build networks of routers, switches, Firewalls and PC's. Very cool stuff and very free too. Which is always nice! Getting up and running is pretty easy with GNS3 but there are plenty of videos on YouTube if you get stuck. You'll also need a couple of IOS's as well (cough cough bittorrent cough)
So once you have GNS3 up and a IOS to play with, you can get down to building your virtual test lab to get your feet wet without screwing up any physical devices.

All you then need to do is right click on a device, start it up and then select Console.

Bingo! Your very own Cisco test lab to play with whilst you learn.
OK, thats it for this quick update post, I will be posting again within the next few days on configuring a router.
I really hope this set of posts are useful to someone other than myself.
Getting Closer to God with Privilege Escalation
Whilst assessing vulnerabilities in the PC build I have I found the following. Now I always get pissed off when I hear people rattle on about the AT command and using that to get a SYSTEM shell. In my experience after XP SP2 you’re required to be an admin to run AT, so what’s the point really?
So rather than just focussing on holes in the Microsoft system, which frankly I'm not really talented enough to find much there, I decided to look at the configuration and implementation. In my opinion I would have much better luck looking for mistakes made by people not necessarily trying to secure a system but more trying to get a system to work.
In this post I'll focus a common mistake made by the guys who build the system which allows a standard user to escalate to have full system privileges.
Looking at Services
It would be nice to use WMIC to look for services that are in a directory that I can write to and that start automatically:
wmic service get name,startmode,pathname | find /i "auto"
However, when trying to run WMIC I get an error telling me that I need to be a member of the Administrators group. I could just go to the Services.msc but this means that I have to go through each service to get that path to the executable. A better tool I found for this is MSInfo32.exe

As can be seen in the screenshot I can quickly scan down the autostarted services for ones that have paths that I can write to. I also need the service to be running with an account with some decent privileges.
OK, VNC looks pretty good.
I go to the directory that VNC runs from and rename the executable. I copy Taskmgr.exe from System32 to the VNC directory and rename it as the VNC executable.

After a restart I see that I have no VNC in the system tray, so I go to the Services.msc and start it. Task Manager starts up for about a minute and then closes. Ok, that’s good. I start the service again and quickly launch a command shell before it closes, great now I have my system command shell. From here I can add accounts, change settings, install software etc... But maybe I want my full desktop. I launch Taskmgr.exe from the command shell, kill explorer from the process list and the launch explorer from File menu. Fantastic, I have a whole desktop running as System, now I really am closer to god!
Toying With Terminal Services
Whilst on holiday this week I began to get bored in the evenings with no internet access and whilst everyone else watched TV. So I decided to set myself a little VM lab up on my Mac and play with Terminal Services.
My aim was pretty simple, from a very locked down desktop I wanted to bypass the restrictions put in place and see how I could get to programs that the admin had tried to prevent me from getting to.
As we can see, all I have access to is a desktop with Notepad. No right click, Internet Options are restricted, the desktop is extremely locked down by group policies.

So once again I'm on the hunt for holes in the group policy so I can enumerate the domain and get to websites to post data or for additional tools etc...
As I start to hunt around I figured instead of accessing the desktop as I am supposed to, what if I configured my RDP client to launch one of the programs that I need straight after login instead of going to the desktop.

And what do you know........Bingo!

Although in group policy the admin could have restricted access to cmd.exe it's pretty hard to run login scripts etc.. so most admins won't, they'll just make it difficult to get to.
Of course this worked for launching an MMC also, and pretty much any program. Again the snappins for MMC's can be restricted in group policy but how many admins are going to go to that level?

Coming up.......More Terminal Services goodness.
Friday, October 23, 2009
DDoS, antara iseng dan kriminal, antara iseng dan kriminal
Ah Sapi lo !! maen DDoS² aja lo, biar gw kurang ngarti ma gitu²an trus kaga ada di tempat waktu itu, tapi tetep aja kaga enak ma yg punya warnet dul, klo mpe putus koneksi ntar gw juga yg kena, gila lo ye warnet temen sendiri maen lo DDos² aje
Masih inget banget tampang bete dari temen gw bung benz tapi tetap dengan cengengesan waktu dia ngomong gitu ke gw, ya gimana ga bete klo warnet tempat dia kerja gw isengin, yup iseng, gada motif laen selain iseng
Sebener’a sey berawal dari temen gw tukulesto yg lagi chat ma gw via yahoo messenger, iya bener tukulesto, panggilan’a tukul tapi dia fans berat tiesto, maka’a panggilan’a jadi tukulesto, tapi itu bukan nama aseli loch, nah cerita’a ketika gw lagi chating ma tukul via YM, dan saat itu lagi marak²a situs rapidshare and youtube di blokir ma pemerintah, eh tau² tukulesto ini private messege ke gw sambil ngebuzz, kira² percakapan’a kya gini:
T: yeeeAh !! rapidshare ma youtube jebol juga !!
G: hah !! gila lo ngejebol rapidshare ma youtube?!! (sambil memandang takjub)
G: Lo deface kul? apa lo bikin down server’a? sadis juga lo ye
T: bukan², mksud gw, gw bisa akses youtube ma rapid ney pk proxy
G: o0o… kirain kul, mana bagi dunk proxy’a, punya gw dah mati semua ney
G: cape gw bikin proxy molo, paling cuma awet 2 harian doank
G: mana? minta dunk? paste’in disini aja kul…
T: iye sabar², ini baru mo gw paste
G: sep
Akhir’a dia ngasih cukup banyak proxy server ke ym gw, entah kenapa dari sekian bnyk proxy yg dia paste, satupun gada yg gw pake, cuma ngeliatin aja sambil males²an nanggepin tuch anak dan entah kenapa juga niat iseng gw tau² muncul waktu gw ngeliatin beberapa nomor² IP address yg dia paste. Hmmm.. secara siang itu gw juga lagi dapet shell inject baru, sambil mikir dan trus bertanya dalem hati sendiri, kira² tukul kena ga yach klo gw social enginering ma dia, tapi masa sey segampang itu dia bisa di kibulin, ahkz coba aja dolo lah
G: eh kul² coba lo check ip public lo dey kul
T: mang knapa yan?
G: takut’a lo kena banned ma rapid gara² lo make proxy server
T: ah yakin lo?
G: lah masa gw boong sey ma lo(padahal dalam hati sey “emang gw boong”)
G: rapid tuch nolak klo lo pk proxy server, nah klo ketauan terus²an
G: ip lo bisa kena banned, maka’a mo gw check dolo, sapa tau bisa gw akalin
T: o0o… gimana cara’a yan nge-check ip address public gw
G: zZz²
T: ![]()
G: buka google trus ketik ip check, pilih aja situs yg pertama
G: nah di sono pasti kliatan ip public lo
T: ooohh
T: udah ney, udah tau gw nomer ip nich kompi
G: mana coba liat, sapa tau bisa gw akalin biar lo ga kena banned ma rapidshare
Dan seketika itupun dia langsung ngasih ip address public number’a secara cuma² ke gw, dan jelas dengan sangat sah gw ngakak abis, bener² bisa gw boongin ney orang
G: Bruakakakakak
T: napa lo
G: bego bener dah lo, bruakakakak
G: gw DDoS ye, iseng kul gada gawean ney gw, bruakakakakak
T: jangan dunk kaka, saya kan masih cupu kaka =(
G: hasyaahh, saya juga cupu kaka =)
tanpa basa basi busuk dan tanpa rasa belas kasian gw ke dia yg minta “jangan” ke gw, langsung aja gw load 5 server berbeda dari hasil pembuatan backdoor webshell dari shell inject gw yg baru, masing² server gw upload beberapa tool diantara’a Vadim.tgz dan UDP.pl yg langsung gw eksekusi dan langsung gw tembak ke ip address target
Yup 5 server sekaligus, begitu gw ping ke ip dia, ternyata traffic’a langsung naek dari 2 digit ke 4 digit or klo ga salah dari traffic time left’a sekitar 56 jadi 4850an lah, jelas gw ngakak abis di atas penderitaan temen gw, sekitar ½ jam tuch warnet gw DDoS ga pake rasa kesian dan ga brenti², tau² besok’a pas ketemu gw dia ngomong gini:
T: ah kampret lo, masa gw lagi download 6 file dari 20KBps turun drastis jadi 3KBps
G: hehehehe sori kul (sambil cengegesan masang tampang ga bersalah)
G: trus gimana kul? putus ga koneksi lo?
T: 1 koneksi kya’a putus, gw liat di billing server request time out panjang dul
T: akhir’a gw switch aja ke line koneksi yg kedua
G: sori kul sori, abis’a gada gaweans euy
dan lusa’a gw di caci maki lagi sama bung benz, nah dari kejadian nyata dan motif iseng diatas, apa itu termasuk ke dalam kriminalitas? yaiyalah masa yaiyadonkz, lalu bagaimana dengan salah satu berita yg gw kutip dari salah satu situs, seperti berikut:
Pemerasan Ala Hacker Makin Ganas
Pemerasan yang memanfaatkan serangan DDoS makin mengganas. Jika sebelumnya target adalah situs judi atau situs porno, kini situs keuangan masuk dalam daftar korban.
DDoS (distributed denial of service) adalah salah satu jenis serangan cyber favorit untuk melumpuhkan sebuah situs. Seperti banyak serangan di Internet, DDoS cukup akrab dengan dunia hacker.
Serangan itu, beberapa bulan terakhir, kerap digunakan untuk tindak kejahatan pemerasan. Pelaku serangan akan mengancam korbannya dengan serangan DDoS. Lazimnya pemerasan, korban dipaksa membayar sejumlah uang tertentu untuk menghindari serangan.
Target serangan biasanya adalah situs ‘remang-remang’ yang mengoperasikan perjudian atau konten porno. Namun parahnya, modus itu mulai merambah ke situs pemroses transaksi kartu kredit.
Hal tersebut terjadi pada situs Authorize.net. Situs tersebut merupakan penyedia jasa proses transaksi kartu kredit. Authorize digunakan untuk menentukan validitas data kartu kredit pelanggan dan bisa juga untuk mencegah pencurian kartu kredit.
Sekali Dayung, Dua Tiga Pulau Terlampaui
Sampai dengan tanggal 22 September waktu setempat (Authorize.net berbasis di Amerika Serikat -red.) Authorize.net masih mengalami serangan secara acak. Sebelum serangan dimulai, Authorize mengaku menerima surat pemerasan.
Naftali Bennet, CEO perusahaan keamanan internet Cyota, melihat ‘manfaat’ ganda yang didapatkan dari serangan terhadap Authorize dan penyedia jasa sejenis. “Sementara layanan online mereka mati, transaksi bisa jadi harus diproses secara manual lewat telepon. Ini akan menyebabkan penundaan, dan dapat menguntungkan pengguna kartu kredit palsu (carder -red.),” tuturnya.
Serangan DDoS, ujar Bennet, sebenarnya berawal dari pekerjaan iseng. Namun hal itu berlanjut jadi kegiatan kriminal saat dibarengi dengan pemerasan. “Biasanya calon korban adalah situs judi atau situs porno, pasalnya status mereka yang ‘remang-remang’ akan membuat mereka malas menghubungi polisi dan lebih memilih untuk membayar,” Bennet menjelaskan.
source : venom's Blog
Subscribe to:
Posts (Atom)

