A new Valentine’s Day spam email has been detected by Websense as containing a Waledac variant. Websense Security Labs has reported to have seen several fake Valentine’s Day sites serving up malware recently, with an increase in adult dating and ‘healthcare’ related email spam released to mark the occasion. Carl Leonard, Websense threat research manager, claimed that it works by the user opening the URL in the spammed message and being redirected to a site with two puppies and a love heart to give a Valentine’s theme. The user is then enticed to download a Valentine’s kit to prepare a present for a loved one, which is a new Waledac variant.
Leonard said: “The usual suspects have emerged as expected, with Valentine spam emails and Trojans. The public are becoming more aware of these and it is getting harder to trick people this way. Cybercriminals are also taking their efforts to social networks, given its rising popularity and potential to manipulate the user through ‘friend’ messages.
“Organised criminal units have a long history of timing their attacks to coincide with popular occasions in order to achieve maximum success. Valentine’s Day 2009 is a day that is similarly marked on the criminals’ calendar for targeted attacks.â€
Websense has warned of three key signs of fake sites: ‘Broken Hearts’ sites show colourful images such as puppy dogs or a picture of 12 pretty hearts and ask ‘Guess, which one is for you?’. The web page however is one big image and a single click from a tricked user commences the download of Trojans named “onlyyou.exe†or “youandme.exeâ€, which can connect to remote websites to receive commands and send information about the compromised system.
‘I am your friend’ uses social networking tricks to get users to visit fake sites, with Websense claiming that a popular technique at the moment is spam email pretending to originate from social networking sites – complete with love hearts and cartoon characters. Clicking through to the link would download a Trojan designed to steal log in credentials for banking sites.
Seventy per cent of the top 100 most popular websites either hosted malicious content or contained a masked redirect to lure unsuspecting victims from legitimate sites to malicious sites. Specially created malicious sites are in decline as cybercriminals switch to compromising ‘trusted’ websites. Websense claimed that as there is increased confidence in shopping and researching online - a lot of which happens whilst in the office – people are turning to the internet to order flowers, chocolates and other gifts and cybercriminals are compromising these sites and stealing data.
Leonard said: “The underground economy is positively flourishing as companies fail to keep up with security technology. Criminals are taking advantage of the growing number of Web 2.0 properties, which allows user generated content. More than ever we’re seeing websites injected with links to direct users to malicious and compromised sites.
“Since many email security systems lack web intelligence, spammers have also stepped up email campaigns which contain links to malicious web pages. It’s clear that businesses need security with real-time protection, but until this becomes the norm – cybercriminals will continue stealing data and breaking hearts.â€
source : http://www.hacking-news.com/
Showing posts with label server. Show all posts
Showing posts with label server. Show all posts
Sunday, February 7, 2010
Wednesday, December 16, 2009
IP Routing - RIP
In this post i'm going to describe how to configure RIP as a routing protocol. I'll be using the network layout as shown below.

Router 1 (R1)
FastEthernet 0/0 - 192.168.1.1/24
loopback 0 - 172.16.10.0/24
Router 2 (R2)
FastEthernet 0/0 - 192.168.1.2/24
FastEthernet 1/0 - 192.168.2.1/24
Router 3 (R3)
FastEthernet 0/0 - 192.168.2.2/24
About RIP
First a bit about RIP. RIP is a distance vector dynamic routing protocol. That means it populates its routing table based on the routing updates its recieves from it's neighbors and it calculates the best path based on distance (or hops).
RIP comes in 2 versions, version 1 and version 2. RIP V1 has been around since the late 60's, is classless meaning it doesnt send subnet information, it has no authentication and it works by broadcasting the routes it knows about every 30 seconds. RIP V2 is classfull, supports authentication and uses multicast (224.0.0.9). RIP is non-proprietry so it is supported on a range of equipment and not just cisco. RIP (V1 and V2) both have an administrative distance of 120.
Configuring RIP
Okay, now the fun part. I'll be setting up RIP V2 in this post.
The way RIP works is I enable it on my router, tell it to use version 2, and tell it what networks to advertise.
To start with lets see what routes R1 knows already:
R1#show ip route
C 172.16.10.0 is directly connected, Loopback0
C 192.168.1.0/24 is directly connected, FastEthernet0/0
Okay, so it knows about the directly connrected routes. What about R3?
R3#show ip route
C 192.168.2.0/24 is directly connected, FastEthernet0/0
Great. No chance of pinging the 172.16.10.1 interface on R1 then. For this pinging business to be sucessfull I need to enable RIP V2 on all the routers. I then need to list all the networks that each router knows about. Like this.
Router 1 (R1)
R1(config)#router rip
R1(config-router)#version 2
R1(config-router)#network 192.168.1.0 255.255.255.0
R1(config-router)#network 172.16.10.0 255.255.255.0
Router 2 (R2)
R2(config)#router rip
R2(config-router)#version 2
R2(config-router)#network 192.168.1.0 255.255.255.0
R2(config-router)#network 192.168.2.0 255.255.255.0
Router 3 (R3)
R1(config)#router rip
R1(config-router)#version 2
R1(config-router)#network 192.168.2.0 255.255.255.0
Great. Now i'll check R3 routing table.
R3#show ip route
Gateway of last resort is not set
R 172.16.0.0/16 [120/1] via 192.168.2.1, 00:00:17, FastEthernet0/0
R 192.168.1.0/24 [120/1] via 192.168.2.1, 00:00:17, FastEthernet0/0
C 192.168.2.0/24 is directly connected, FastEthernet0/0
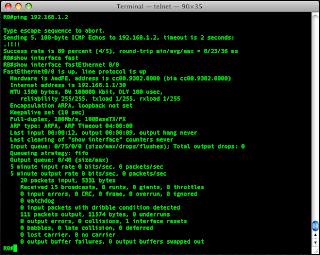
Brilliant. I can now see the routes to 172.16.0.0 network. And can I ping it?
R3#ping 172.16.10.1
Type escape sequence to abort.
Sending 5, 100-byte ICMP Echos to 172.16.10.1, timeout is 2 seconds:
!!!!!
Success rate is 100 percent (5/5), round-trip min/avg/max = 60/72/92 ms
So remember, you have to tell the router which networks you want to advertise and if you dont list the network which an interface is configured for, RIP won't advertise out of that interface.
Lastly in this section I will cover how to turn off RIP propogating out of an Interface. This could be because you have RIP enabled but on of your interfaces is connected to a untrusted network for example. To prevent the propogation you wolud make the interface passive. You will still recieve RIP updates onthe interface bt will not send them.
In the example below I'll prevent Router 2 from sending updates to Router 3.
R2(config)#router rip
R2(config-router)#version 2
R2(config-router)#network 192.168.1.0 255.255.255.0
R2(config-router)#network 192.168.2.0 255.255.255.0
R2(config-router)#passive-interface fastethernet 1/0
Configuring Authentication
Below I am going to configure authentication on my RIP updates. What I noticed in my lab was as soon as I set this up on a router the remote routers lost all routes until they too were configured for authentication. So it seems that this is an all or nothing thing.
Below I enter global config mode, create a keychain called homelab, a key, and I give the key a password of cisco.
R1#configure terminal
R1(config)#key chain homelab
R1(config-keychain)#key 1
R1(config-keychain-key)#key-string cisco
Now I enter the interface configuration and, tell it what key chain I'm using and tell it to use MD5. This has to be done on each interface that RIP will be sent or received on. Also, each neighboring router needs to use the same key (cisco) as set up in the steps above.
R1#configure terminal
R1(config)#interface fastEthernet 0/0
R1(config-if)#ip rip authentication key-chain homelab
R1(config-if)#ip rip authentication mode md5
R1(config-if)#end
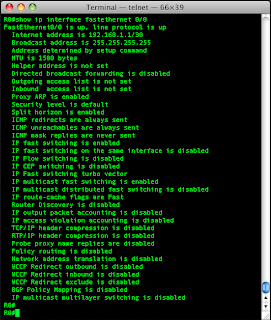
Running a show ip protocols lists what the router knows about the authentication you have configured.
R2#show ip protocols
Routing Protocol is "rip"
Outgoing update filter list for all interfaces is not set
Incoming update filter list for all interfaces is not set
Sending updates every 30 seconds, next due in 3 seconds
Invalid after 180 seconds, hold down 180, flushed after 240
Redistributing: rip
Default version control: send version 2, receive version 2
Interface Send Recv Triggered RIP Key-chain
FastEthernet0/0 2 2 homelab
FastEthernet1/0 2 2 homelab
Automatic network summarization is in effect
Maximum path: 4
Routing for Networks:
172.16.0.0
192.168.1.0
192.168.2.0
Routing Information Sources:
Gateway Distance Last Update
192.168.2.2 120 00:08:39
192.168.1.1 120 00:00:03
Distance: (default is 120)
Troubleshooting RIP
The commands that I have found useful in helping to troubleshoot RIP are:
R1#show ip protocols
Routing Protocol is "rip"
Outgoing update filter list for all interfaces is not set
Incoming update filter list for all interfaces is not set
Sending updates every 30 seconds, next due in 25 seconds
Invalid after 180 seconds, hold down 180, flushed after 240
Redistributing: rip
Default version control: send version 2, receive version 2
Interface Send Recv Triggered RIP Key-chain
FastEthernet0/0 2 2
Loopback0 2 2
Automatic network summarization is in effect
Maximum path: 4
Routing for Networks:
172.16.0.0
192.168.1.0
Routing Information Sources:
Gateway Distance Last Update
192.168.1.2 120 00:00:20
Distance: (default is 120)
In the output above there are a bunch of timers (Update, Invalid, Holddown and Flush). These need to be the same on each router.
R2#show ip rip database
172.16.0.0/16 auto-summary
172.16.0.0/16
[1] via 192.168.1.1, 00:00:00, FastEthernet0/0
192.168.1.0/24 auto-summary
192.168.1.0/24 directly connected, FastEthernet0/0
192.168.2.0/24 auto-summary
192.168.2.0/24 directly connected, FastEthernet1/0
R2#show ip route rip
R 172.16.0.0/16 [120/1] via 192.168.1.1, 00:00:16, FastEthernet0/0
R2#show ip route
Codes: C - connected, S - static, R - RIP, M - mobile, B - BGP
D - EIGRP, EX - EIGRP external, O - OSPF, IA - OSPF inter area
N1 - OSPF NSSA external type 1, N2 - OSPF NSSA external type 2
E1 - OSPF external type 1, E2 - OSPF external type 2
i - IS-IS, su - IS-IS summary, L1 - IS-IS level-1, L2 - IS-IS level-2
ia - IS-IS inter area, * - candidate default, U - per-user static route
o - ODR, P - periodic downloaded static route
Gateway of last resort is not set
R 172.16.0.0/16 [120/1] via 192.168.1.1, 00:00:02, FastEthernet0/0
C 192.168.1.0/24 is directly connected, FastEthernet0/0
C 192.168.2.0/24 is directly connected, FastEthernet1/0
R2#debug ip rip events
RIP event debugging is on
R2#
01:30:43: RIP: sending v2 update to 224.0.0.9 via FastEthernet0/0 (192.168.1.2)
01:30:43: RIP: Update contains 1 routes
01:30:43: RIP: Update queued
01:30:43: RIP: Update sent via FastEthernet0/0
The command above will turn on debugging for RIP updates.
Okay. That's about all I have on RIP.
Using RADIUS to Authenticate Logins
In this post i'll detail how to set up a Windows IAS RADIUS server to authenticate user login on a router.
Windows IAS Server Setup
- Create a Windows Security group with the users you want to allow access to the routers
- Enable the user accounts to have Dial-in Access.
- Install IAS on the server (from Add Remove programs).
- Create a new cisco RADIUS Client, point it to the Router and supply a shared key. Set the Grant Remote Access.

5. Create a new Remote Access Policy with the following settings:
- Windows Group (point this to the group you created)
- Edit the profile and set the autentication to PAP
- Under the advanced tab set the service type value to login & remove Framed-Protocol.

Thats really it. A detailed tutorial on setting up your IAS server can be found here.
Router Setup
Here I am going to configure my router to use AAA Authorization to authorise access by looking at the user credentials in Active Directory (AD). Remember, only AD users in the group I created above will be able to login with their windows credentials.
First I'll talk you through what I'm doing in the following commands.
I'm creating a local user on the router called syn. This is so I can still get into the router if my RADIUS server fails.
I enable AAA and I create a new entry in AAA to point to my RADIUS server (using the default ports) and give it a the key "cisco" to match what we set up on the RADIUS server.
I then enable my ethernet interface on the same LAN as the RADIUS server as the RADIUS source interface and create a AAA authentication login method list called AuthList. This rule will first look to authenticate by RADIUS and then locally if the RADIUS server fails. I then apply the method list to my VTY (Telnet/SSH) ports.
R1>en
Password:
R1#
R1#conf t
Enter configuration commands, one per line. End with CNTL/Z.
R1(config)#user syn password cisco
R1(config)#aaa new-model
R1(config)#radius-server host 10.0.1.230 auth-port 1645 acct-port 1646 key cisco
R1(config)#ip radius source-interface ethernet 1
R1(config)#aaa authentication login AuthList group radius local
R1(config)#line vty 0 4
R1(config-line)#login authentication AuthList
R1(config-line)#exit
R1(config)#exit
R1#
A detailed tutorial can be found here. Just remember to enable the user account for Dial-in access in the AD account properties.
After setting this up I also needed to configure RADIUS authentication on my Console port and Aux port using the following for each port:
R1(config)#line console 0
R1(config-line)#login authentication AuthList
R1(config-line)#exit
R1(config)#line aux 0
R1(config-line)#login authentication AuthList
R1(config-line)#exit
R1(config)#exit
R1#
Troubleshooting
Debugging on the router can be achieved with the following commands:
R1# terminal monitor
R1# debug aaa authentication
The command below will test a login from the router. You should be able to check your event logs and IAS logs on the RADIUS server to see this account authenticate.
R1# test aaa group radius syn SuperStrongPassword port 1645 new-code
Backup & Restore IOS and Configs
As with any aspect of computer data, the IOS and the router configs need backing up. This is pretty simple and in this post post I'll show a few different ways of doing this.
Backing Up
First the easy way. Copy and Paste.
Using the show commands you can output the running-config or the startup-config to screen. This config can be copied and pasted directly into a text file. In Windows use Wordpad as it keeps the formatting better.
Router#show running-config

You need to copy everything from and including the exclamation mark under the line "Current Configuration" to the last line (and including) which starts with "end".
And when you are restoring it just get yourself into configure mode (Configure Terminal) and paste it back in. Simple!
Now using TFTP.
Get yourself something running a TFTP Server. A nice free one is TFTPd32.
From your router make sure you have connectivity to your TFTP Server by pinging it. Then we use the Dir command to check the IOS name and the copy command to copy the IOS and the config to our TFTP Server.
Router#dir flash:
Router#copy flash:c831-k9o3y6-mz.124-4.T1.bin tftp
Address or name of remote host []? 10.0.1.11
Destination filename [c831-k9o3y6-mz.124-4.T1.bin]?
Router#copy startup-config tftp://10.0.1.11/startup-config
Address or name of remote host [10.0.1.11]?
Destination filename [startup-config]?

So in the example above, for the IOS i just specify I want to copy the file to TFTP. I then get prompted for an IP Address and asked to confirm the filename by pressing enter.
For the Startup-Config I specify the TFTP server and filename after the copy command. This way I only get asked to press enter to confirm both the IP and the filename.
And below I can see the progress of my copy to the TFTP Server.


One final note on backing up. Recently I was having an issue with the NVRAM holding my startup-config and I got tired of hooking up my TFTP Server. So I copied it to flash and simply restored it to running-config from there using the following command:
Router#copy flash:startup-confg running-config
Restoring
Restoring is just really the oposite. To grab the config from a TFTP server I would use:
copy tftp://10.0.1.3/startup-config running-config
or for the IOS:
copy tftp://10.0.1.3/ios-file-name.bin flash:ios-file-name.bin
The only points here are:
- If your IOS is larger than the free space in flash it will overwrite the existing IOS in flash. But be sure not to reboot a router between deleting an IOS file from flash and restoring the new one.
- After restoring a config all interfaces are placed in a shutdown state.
- Restored configs merge into existing configs so if this isn't what you want use the erase command before restoring.
Configuring Router Interfaces
In this post I'll cover the configuration of an ethernet interface on the router, and I'll demonstrate commands to interrogate and help troubleshoot the interfaces.
Lab Setup
In this lab I'll have two router and I'll configure them to talk to each other
To start with you might want to clarify exactly which interfaces your router might have. This can be done visually (by looking at the device) or by using some of the excellent show commands.
The show version command will print to the screen exactly which interfaces are installed.
R0>en
Ro#show version
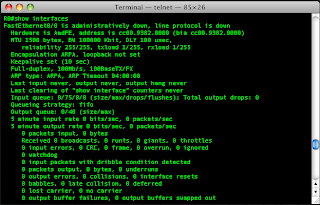
The show interfaces command gives details on the configuration of the interface, setting such as duplex and speed, and it will also show traffic statistics.
R0#show interfaces
If you have many interfaces in your router you can just focus on a single interface using the interface number (remember, slot/port):
R0#show interfaces fastethernet 0/0
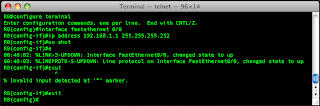
From the output I can see that the interface isn't configured. I'll configure that port and then take another look. I'll go into configuration mode select the interface, give it an IP address and subnet mask then tell it not to be in the shutdown state. Remember, by default all ports are in a shutdown state. Another import thing to remember is if you restore your config from a backup the ports will need to be taken out of the shutdown state manually.
R0>enable
R0#configure terminal
R0(config)#interface fastethernet 0/0
R0(config-if)#ip address 192.168.1.1 255.255.255.252
R0(config-if)#no shut
R0(config-if)#exit
I saw the line come up when I was setting the port up, so now i'll ping my other router.
Wel the ping came back fine and after another look at the interface I can see it has the right IP address and the counters are updating nicely.
Another great command for looking at the interface is:
R0#show ip interface fastethernet 0/0
This shows me absolutely everything that is set or can be set on the interface.
And finally one last command for looking at the interface status in a nice condensed format is:
R0#show ip interface brief
Here I see all interfaces, what there IP addresses are and whether they are up or not.
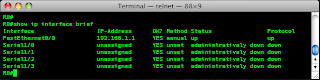
So this has been a quick post on setting up an interface with an IP address and using some handy show commands to check the interface.
Lab Setup
In this lab I'll have two router and I'll configure them to talk to each other

To start with you might want to clarify exactly which interfaces your router might have. This can be done visually (by looking at the device) or by using some of the excellent show commands.
The show version command will print to the screen exactly which interfaces are installed.
R0>en
Ro#show version

The show interfaces command gives details on the configuration of the interface, setting such as duplex and speed, and it will also show traffic statistics.
R0#show interfaces

If you have many interfaces in your router you can just focus on a single interface using the interface number (remember, slot/port):
R0#show interfaces fastethernet 0/0
From the output I can see that the interface isn't configured. I'll configure that port and then take another look. I'll go into configuration mode select the interface, give it an IP address and subnet mask then tell it not to be in the shutdown state. Remember, by default all ports are in a shutdown state. Another import thing to remember is if you restore your config from a backup the ports will need to be taken out of the shutdown state manually.
R0>enable
R0#configure terminal
R0(config)#interface fastethernet 0/0
R0(config-if)#ip address 192.168.1.1 255.255.255.252
R0(config-if)#no shut
R0(config-if)#exit

I saw the line come up when I was setting the port up, so now i'll ping my other router.

Wel the ping came back fine and after another look at the interface I can see it has the right IP address and the counters are updating nicely.
Another great command for looking at the interface is:
R0#show ip interface fastethernet 0/0

This shows me absolutely everything that is set or can be set on the interface.
And finally one last command for looking at the interface status in a nice condensed format is:
R0#show ip interface brief
Here I see all interfaces, what there IP addresses are and whether they are up or not.

So this has been a quick post on setting up an interface with an IP address and using some handy show commands to check the interface.
Securing Your Router
In this post i'll cover the following:
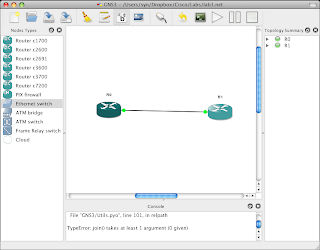
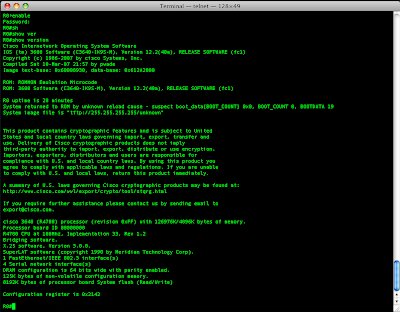
Right. So I've got my test lab set up. To start with i'll just have one router called R0. I'll demonstrate how to configure the router and secure it. I bring up the console after starting R0 and Terminal (on the Mac by the way) acts as if I was physically connected to the console port on the router itself. After the IOS decompresses and is loaded into RAM I'm prompted to enter the initial configuration setup. I say no to this as I will be manually configuring the router.The first thing I want to do is give my router an Enable password. The reason for doing so is after I give the interface an IP address there is a window of opportunity for someone to look at the configuration and glean some information that I might not necessarily want them to see.I enter the Enable mode by typing:Router>enableThis will change the prompt from a > symbol to a hash #. Before you enter into the Enable mode there are only limited commands available, these can be viewed by typing ? at the prompt as shown in the previous post.Remember, the hash symbol will be present whenever I am in the Enable mode, and it's from here that I can perform configuration and diagnostic tasks.Router#configure terminalTo configure an enable password as "letmein" I type:Router(config)#enable secret letmeinThis will create a password for the Enable mode and within the configuration it will be encrypted. The password is encrypted with Type 5 encryption (I'll come back to this in a bit).After this I'll give my router a name and a DNS domain name, set the clock and tell it what DNS Servers to use:Router(config)#hostname R0R0(config)#ip domain name home.localR0(config)#ip name-server 10.0.1.1R0(config)#exitR0#clock set 22:00:00 16 aug 2009Notice that my prompt changed to reflect my new name.
 Okay, right now I have a Console port and an Auxilary port I want to configure.To start with I'll secure the Console port. From the Enable mode I want to enter into Configuration mode and then into console port configuration mode. To do this i use the following commands:R0(config)#line con 0R0(config-line)#logging synchronousR0(config-line)#exec-timeout 10 0R0(config-line)#password flipperR0(config-line)#loginR0(config-line)#exitR0(config)#What I have done here is selected to configure line con 0 which is the console port. The prompt changed to indicate which configuration mode I am in. I told it to set logging to synchronous, which means when the informational messages or debugging messages hit the screen it wont screw with my command. I have then set the exec-timeout to 30 minutes and 0 seconds which means my console session will be disconnected after 30 minutes of inactivity. I could have set this to not time out by using 0 minutes and 0 seconds. I have then set my console password to flipper and told it to prompt me to log in by issuing the login command. After entering those I used the exit command to come out of the line con 0 configuration and get back to the configuration mode.I'll do the same for the Aux port as this can be used to access the router as well.R0(config)#line aux 0R0(config-line)#logging synchronousR0(config-line)#exec-timeout 30 0R0(config-line)#password flipperR0(config-line)#loginR0(config-line)#exitR0(config)#After securing the ports I want to set up a banner on my router to warn any unauthorised people that they should not be accessing the router. I do this with the following:R0(config)#banner motd % No unauthorised access %R0(config)#exit
 Different banners can be created for events such as prompt timeout, login, exec or for SLIP/PPP. They can also be real fancy and have ASCII art if you so wish.After all this configuration I look at the running config to check all is as it should be.R0#show running-config
 Here I am able to see all the commands I have entered. Now it's important to remember that the commands take effect as soon as they are typed (and you have pressed enter of course!).One thing that bothers me about the running config as shown in the screenshot is my console passwords and aux port passwords are in clear text. Anyone looking over my shoulder (the wife or dog) could see these and they would be well on there way to owning my router. I can fix this by turning on the password encryption service, showing the config again and then turning it off. But remember, when we configure the VTY (Telnet) ports in a later post I need to do this again otherwise the new VTY ports passwords will be clear text.R0#configure terminalR0(config)#service password-encryptionR0(config)#exitR0#show running-configR0(config)#no service password-encryptionR0(config)#endSo I have entered configuration mode, turned on the password encryption service, looked at the config, then I turned the service off.Now looking at the config I see that the passwords are encrypted with Type 7 encryption. Now one thing about Type 7 encryption, its a piece of piss to crack, Cape in will do it as will many websites. All that Type 7 will do is stop the casual observer from seeing an easily remembered password (if thats what you use). Obviously its goes without saying that your Enable password should be different from the port passwords you set.
 One last thing I noticed is the IP http server is enabled by default.
  As I dont plan to use this I disable it using the "no" commandR0(config)#no ip http serverI check this has worked with another show running-configR0#show running-config
 After finally setting up my router so it is secure i save the settings from running-config to startup-config.R0#copy running-config startup-configR0#show startup-configWhat I have done here is copied the running-config in RAM to the startup-config in NVRAM. The router will prompt me to give the configuration a name but I just press enter to select the default option that is shown in square brackets. After that completed I checked the startup-config.
 In my next post I'll be looking at getting telnet and SSH set up.
Securing Your Router
In this post i'll cover the following:
Right. So I've got my test lab set up. To start with i'll just have one router called R0. I'll demonstrate how to configure the router and secure it.I bring up the console after starting R0 and Terminal (on the Mac by the way) acts as if I was physically connected to the console port on the router itself. After the IOS decompresses and is loaded into RAM I'm prompted to enter the initial configuration setup. I say no to this as I will be manually configuring the router.The first thing I want to do is give my router an Enable password. The reason for doing so is after I give the interface an IP address there is a window of opportunity for someone to look at the configuration and glean some information that I might not necessarily want them to see.I enter the Enable mode by typing:Router>enableThis will change the prompt from a > symbol to a hash #. Before you enter into the Enable mode there are only limited commands available, these can be viewed by typing ? at the prompt as shown in the previous post.Remember, the hash symbol will be present whenever I am in the Enable mode, and it's from here that I can perform configuration and diagnostic tasks.Router#configure terminalTo configure an enable password as "letmein" I type:Router(config)#enable secret letmeinThis will create a password for the Enable mode and within the configuration it will be encrypted. The password is encrypted with Type 5 encryption (I'll come back to this in a bit).After this I'll give my router a name and a DNS domain name, set the clock and tell it what DNS Servers to use:Router(config)#hostname R0R0(config)#ip domain name home.localR0(config)#ip name-server 10.0.1.1R0(config)#exitR0#clock set 22:00:00 16 aug 2009Notice that my prompt changed to reflect my new name.Okay, right now I have a Console port and an Auxilary port I want to configure.To start with I'll secure the Console port. From the Enable mode I want to enter into Configuration mode and then into console port configuration mode. To do this i use the following commands:R0(config)#line con 0R0(config-line)#logging synchronousR0(config-line)#exec-timeout 10 0R0(config-line)#password flipperR0(config-line)#loginR0(config-line)#exitR0(config)#What I have done here is selected to configure line con 0 which is the console port. The prompt changed to indicate which configuration mode I am in. I told it to set logging to synchronous, which means when the informational messages or debugging messages hit the screen it wont screw with my command. I have then set the exec-timeout to 30 minutes and 0 seconds which means my console session will be disconnected after 30 minutes of inactivity. I could have set this to not time out by using 0 minutes and 0 seconds. I have then set my console password to flipper and told it to prompt me to log in by issuing the login command. After entering those I used the exit command to come out of the line con 0 configuration and get back to the configuration mode.I'll do the same for the Aux port as this can be used to access the router as well.R0(config)#line aux 0R0(config-line)#logging synchronousR0(config-line)#exec-timeout 30 0R0(config-line)#password flipperR0(config-line)#loginR0(config-line)#exitR0(config)#After securing the ports I want to set up a banner on my router to warn any unauthorised people that they should not be accessing the router. I do this with the following:R0(config)#banner motd % No unauthorised access %R0(config)#exitDifferent banners can be created for events such as prompt timeout, login, exec or for SLIP/PPP. They can also be real fancy and have ASCII art if you so wish.After all this configuration I look at the running config to check all is as it should be.R0#show running-configHere I am able to see all the commands I have entered. Now it's important to remember that the commands take effect as soon as they are typed (and you have pressed enter of course!).One thing that bothers me about the running config as shown in the screenshot is my console passwords and aux port passwords are in clear text. Anyone looking over my shoulder (the wife or dog) could see these and they would be well on there way to owning my router. I can fix this by turning on the password encryption service, showing the config again and then turning it off. But remember, when we configure the VTY (Telnet) ports in a later post I need to do this again otherwise the new VTY ports passwords will be clear text.R0#configure terminalR0(config)#service password-encryptionR0(config)#exitR0#show running-configR0(config)#no service password-encryptionR0(config)#endSo I have entered configuration mode, turned on the password encryption service, looked at the config, then I turned the service off.Now looking at the config I see that the passwords are encrypted with Type 7 encryption. Now one thing about Type 7 encryption, its a piece of piss to crack, Cape in will do it as will many websites. All that Type 7 will do is stop the casual observer from seeing an easily remembered password (if thats what you use). Obviously its goes without saying that your Enable password should be different from the port passwords you set.One last thing I noticed is the IP http server is enabled by default. As I dont plan to use this I disable it using the "no" commandR0(config)#no ip http serverI check this has worked with another show running-configR0#show running-configAfter finally setting up my router so it is secure i save the settings from running-config to startup-config.R0#copy running-config startup-configR0#show startup-configWhat I have done here is copied the running-config in RAM to the startup-config in NVRAM. The router will prompt me to give the configuration a name but I just press enter to select the default option that is shown in square brackets. After that completed I checked the startup-config.In my next post I'll be looking at getting telnet and SSH set up.
Subscribe to:
Posts (Atom)


